

This how-to is based off a GR, but the concepts should be similar to a GD. I'm not sure how different the front subframe is or how it might interfere with the install.
I'm making this as a response to so many people saying that motor mounts are a terrible install. I think they're cake, and I want to show why. I had originally installed the Tigwerks motor mounts, but their NVH was a little much for my tastes so I went to Group Ns, and that's where this install was born (my second time through). I'd do it again and could accomplish the whole process inside of two hours with mandatory beer breaks.
Without further adieu, here is the how-to. Enjoy, ask questions, and as always, practice safety first!
If you feel you are unable to complete this install, or if you have serious doubts about your jack, do not attempt this. You will be putting your hands in pinch areas if the engine were to suddenly lower. There are potential safety precautions I will mention, but as always be SAFE!! I recommend having another jack and a friend around while doing the pinch area work just in case.
Tools needed:
Flat head
Phillips
12mm shallow and deep sockets
14mm shallow and deep sockets
14mm ratcheting flex head wrench
breaker bar or impact
in-lbs torque wrench
ft-lbs torque wrench
jack
ramps or jack stands (three if you don't have ramps, one if you do)
blocks of wood
Please review the torque values at the end of the how-to before beginning reassembly. Any bolts that I have not listed a value for simply need to be "snug". That should be it. Let's get started.
(Edit: You may or may not have to unbolt the subframe and sway bar. This depends on if you have an aftermarket sway bar or not since the OEM swaybars have bends to allow access.)
(Edit 2: You don't have to remove the upper radiator brackets if you don't want to. This step is in the factory service manual so I figured it would be important and it's quick and easy to do. Skip this at your own risk.)
1.) Place your car on ramps, or put the front end on jack stands. There's a how-to for doing this.
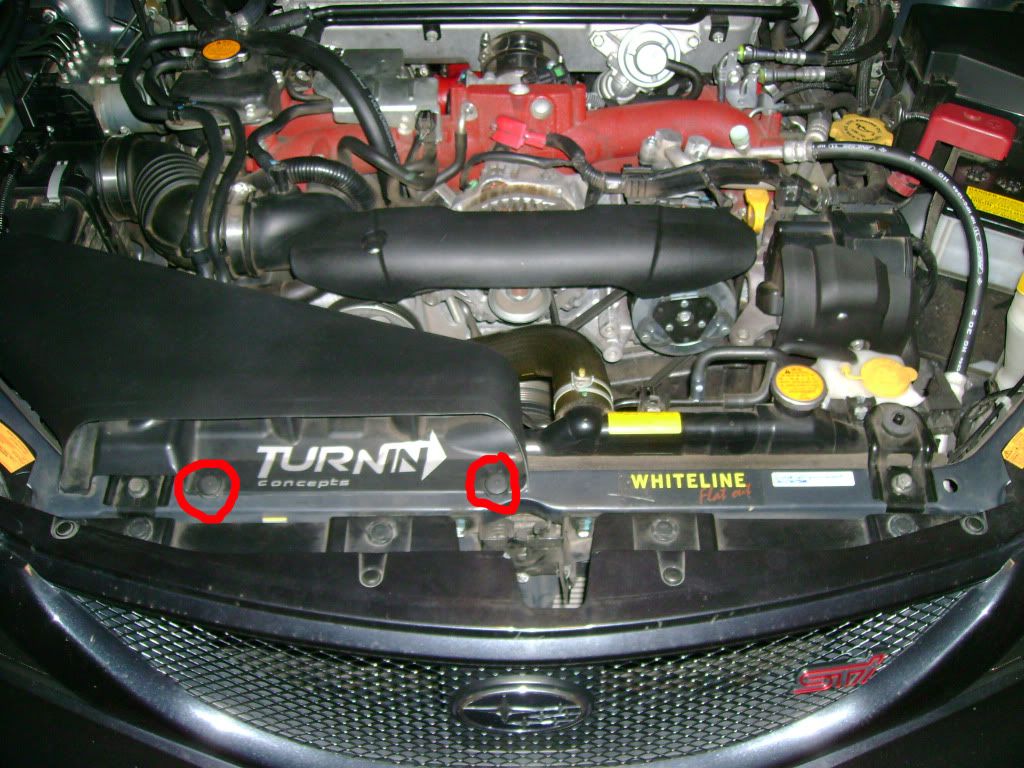
2.) Remove the airbox intake duct by taking out the two plastic clips circled in red. Depending on your year model, they will either be phillips or flat head:
![Image]()
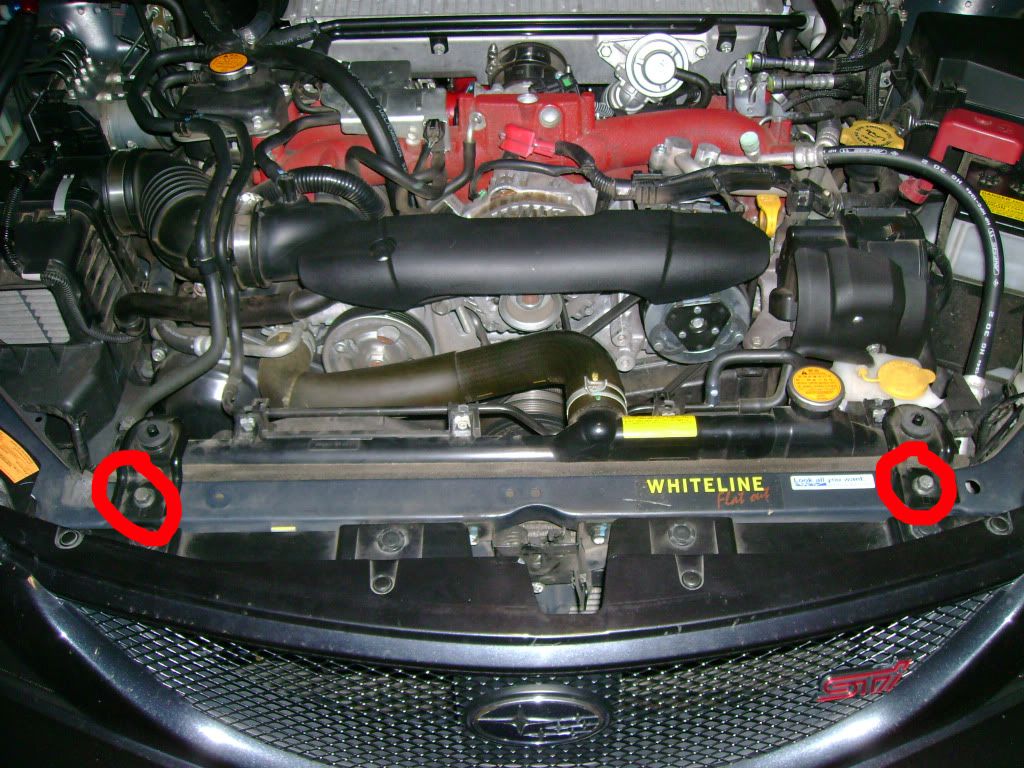
3.) Remove the two upper radiator brackets by removing the two 12mm bolts circled in red. Not shown, but loosen the two clamps at the ends of the airbox's accordion duct. No need to remove them or the duct:
![Image]()
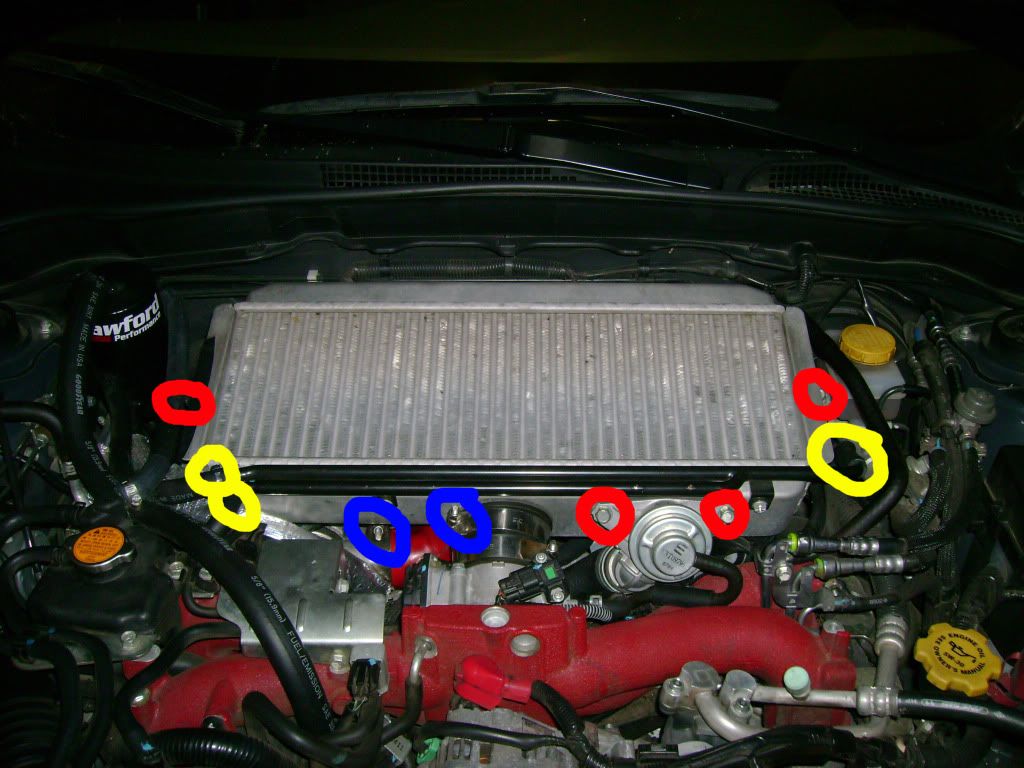
4.) Remove the intercooler. Accomplish this by removing the two 12mm bolts holding the BPV as well as the two 12mm mounting bolts at the ends (all four circled in red. Loosen the two clamps circled in blue (can be done with a phillips or 10mm socket, I believe). Finally, remove the three breather lines from the breather tube (circled in yellow). Just pull and they slip off. Finally, remove the IC by pushing towards the firewall until the TB connection is out, then pull towards the drive side to pull it off the turbo. Be careful of the fins, and set it aside:
![Image]()
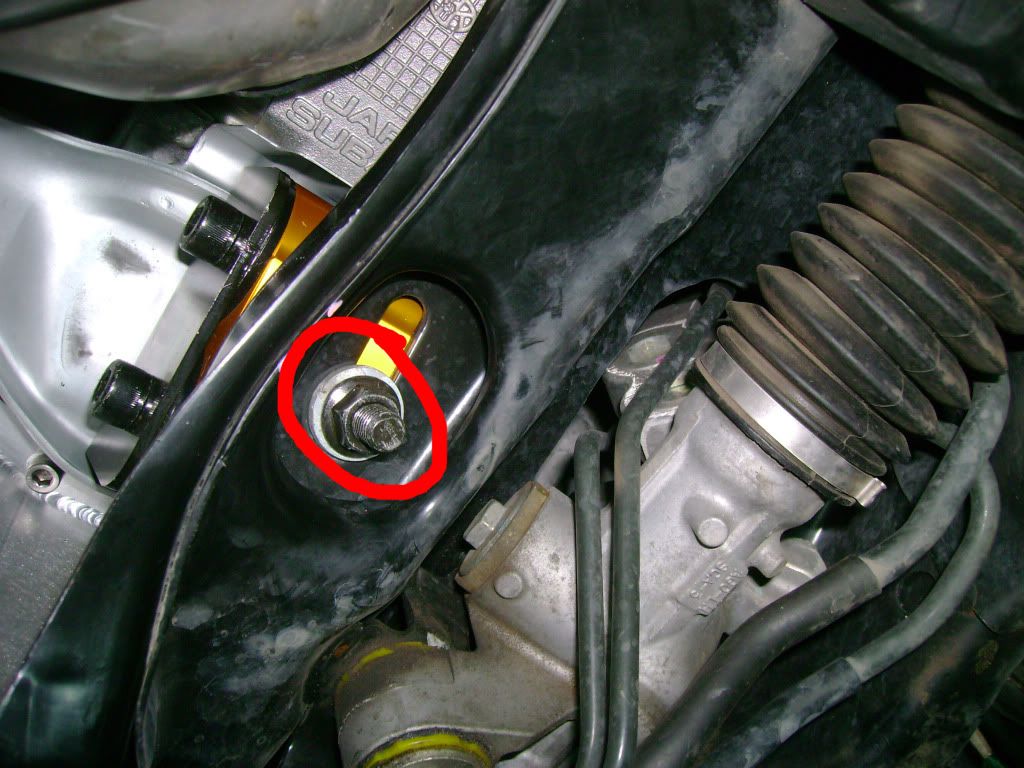
5.) Unbolt the lower pitch stop bolt. Now that the IC is out of the way, access is easy and it is circled in red. Use a 14mm wrench on the nut with a 14mm socket and breaker bar on the bolt head. Once loose, remove the bolt and tilt the pitch stopper up as far as it can go:
![Image]()
6.) Now under the car. Remove the under tray. It's held on with three 12mm bolts, two push clips in the wheel wells (use the flat head to carefully pry up the head of the clip), and two slide on clips at the back to the sides of where the rear 12mm bolt was.
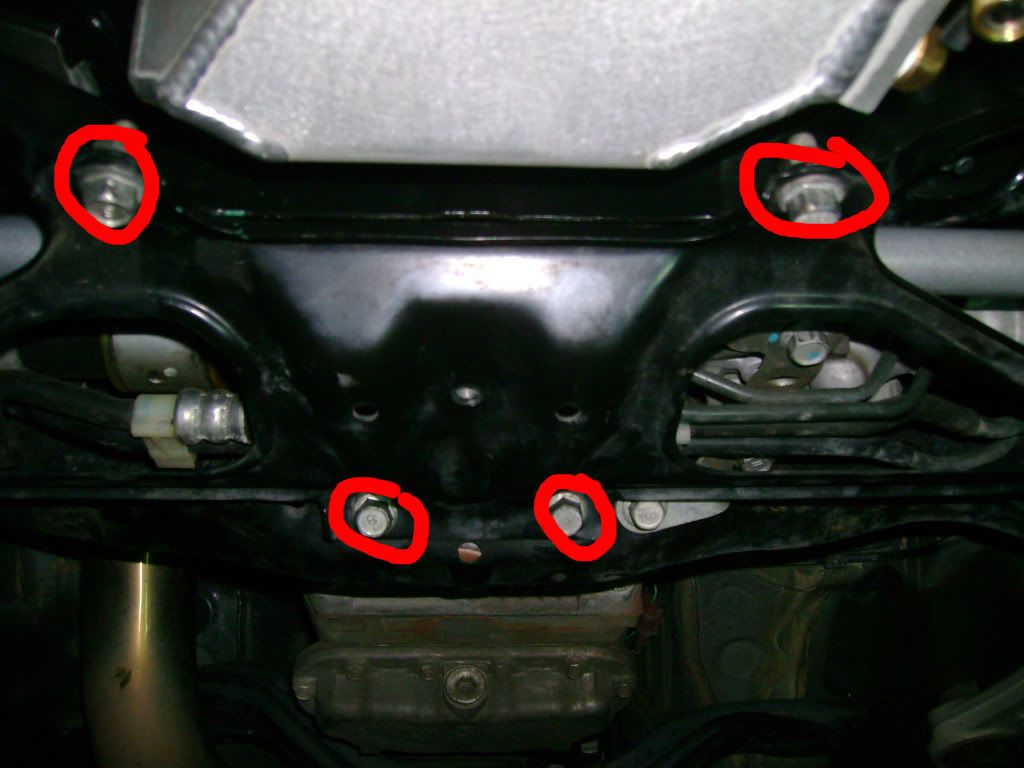
7.) Remove the subframe lower brace as seen here. Ten total bolts, all 14mm (two have 14mm nuts) and you may need your impact/breaker bar. There are four center bolts as circled below (note that the forward two have a nut instead of threads into the subframe):
![Image]()
And six outer bolts (drive side show):
![Image]()
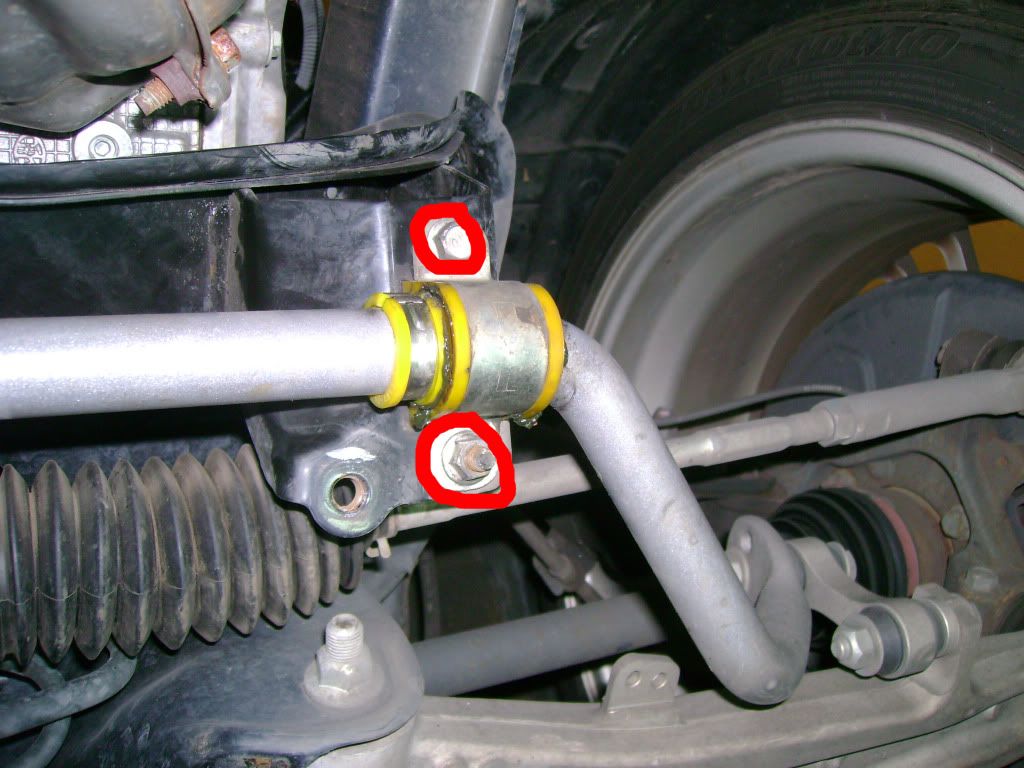
8.) Remove front swaybar D-brackets by removing 12mm bolts and 12mm nuts (one each per side, shown below on driver side):
![Image]()
Then swing the entire swaybar down:
![Image]()
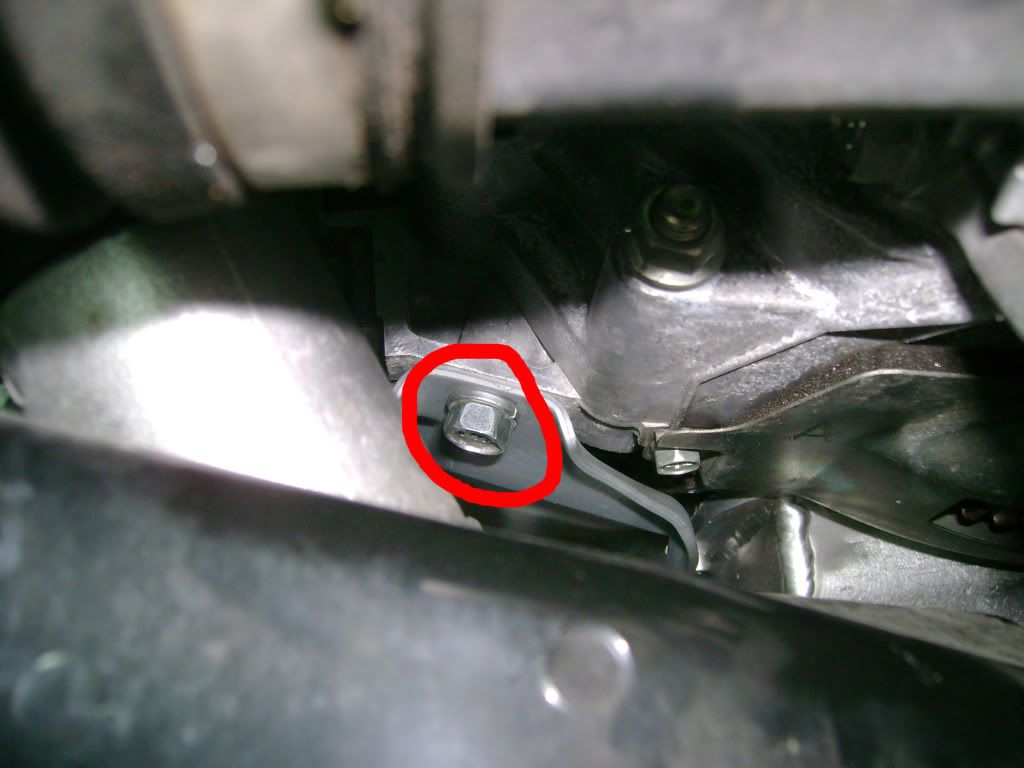
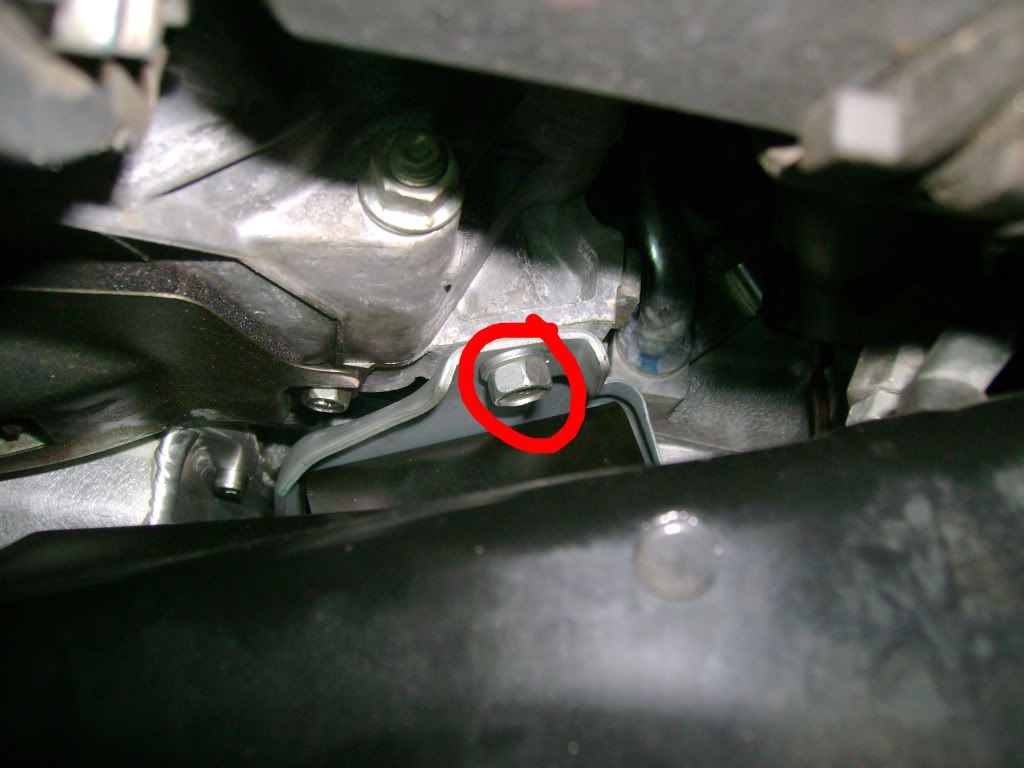
9.) Using your impact or breaker bar and the 14mm deep socket, remove the two 14mm nuts from the bottom of the engine mounts, circled in red:
![Image]()
10.) Now, using a jack with a block of wood, jack up the motor by the oil pan until the studs clear the subframe. I can tell you the first thing to bind will be the AC line that curves around the air pump on the driver's side by the battery. You shouldn't have to go that high though. It is good to have a spotter watching around in the engine bay just in case. If you have it on ramps, at first while jacking the car will rise as the suspension lifts while the weight of the engine is taken from it. Don't be alarmed as it is not stuck (as long as you followed the above steps). Keep going and you will see the engine lift. Take a jack stand and block of wood and put it under the transmission oil pan to offer some protection from the jack falling.
Here is an optional alternative method to protecting yourself. You can take the nuts and screw them onto the shaft on the engine side. This way, if the jack fails, the stud and nut will catch the engine. This is only effective if you only remove one mount at a time (which you should do anyway).
11.) Pick a side to start on. With the engine high enough, use your breaker bar to take out the forward 14mm bolt holding the mount bracket to the engine:
![Image]()
12.) Now, do the same for the rear. Here you will have to use the 14mm flex head ratcheting wrench. This single tool makes this job easy. If you need extra torque to break it free, put another solid box end wrench on the open end to give you more leverage. Once it is removed you can now remove the bracket and mount together. Below are pictures of the rear bolts to help you find them. I can tell you the driver side is the harder since the steering column and rack are more in the way.
Driver side:
![Image]()
Passenger side:
![Image]()
13.) Install your new motor mount into the car for that side, then repeat step 12 for the other side.
14.) Once you're all bolted up (see below for torque values), you can lower the motor. Don't forget to take the nuts off the studs if you were using them as a safety device. Also don't forget to remove the jack stand from the tranny pan.
If you find the studs are too far back and won't align with the slots in the subframe as you lower the engine, here's a trick. Lay under the driver side, but be sure to keep your hands nice and clear of any pinch areas. Have the motor lifted so the studs are just slightly above the subframe with your buddy operating the release. Stick the breaker bar between the driver's side manifold and the subframe and pry the engine forward. Once it's roughly aligned, tell your buddy to VERY SLOWLY lower the engine. Everything should go together fine.
Now put everything back in reverse order of above. Pertinent torque values are below.
Happy motoring and enjoy your new mounts! :tup:
Upper radiator brackets: 8.9 ft-lbs
Pitchstop lower bolt: 36.9 ft-lbs
Lower subframe brace bolts: 44.3 ft-lbs
Front swaybar D-bracket bolts/nuts: 18.4 ft-lbs
Engine mount bracket to engine bolts: 25.8 ft-lbs
Engine mount to bracket nuts: 31.0 ft-lbs
Engine mount to subframe nuts: 62.7 ft-lbs
I'm making this as a response to so many people saying that motor mounts are a terrible install. I think they're cake, and I want to show why. I had originally installed the Tigwerks motor mounts, but their NVH was a little much for my tastes so I went to Group Ns, and that's where this install was born (my second time through). I'd do it again and could accomplish the whole process inside of two hours with mandatory beer breaks.
Without further adieu, here is the how-to. Enjoy, ask questions, and as always, practice safety first!
If you feel you are unable to complete this install, or if you have serious doubts about your jack, do not attempt this. You will be putting your hands in pinch areas if the engine were to suddenly lower. There are potential safety precautions I will mention, but as always be SAFE!! I recommend having another jack and a friend around while doing the pinch area work just in case.
Tools needed:
Flat head
Phillips
12mm shallow and deep sockets
14mm shallow and deep sockets
14mm ratcheting flex head wrench
breaker bar or impact
in-lbs torque wrench
ft-lbs torque wrench
jack
ramps or jack stands (three if you don't have ramps, one if you do)
blocks of wood
Please review the torque values at the end of the how-to before beginning reassembly. Any bolts that I have not listed a value for simply need to be "snug". That should be it. Let's get started.
(Edit: You may or may not have to unbolt the subframe and sway bar. This depends on if you have an aftermarket sway bar or not since the OEM swaybars have bends to allow access.)
(Edit 2: You don't have to remove the upper radiator brackets if you don't want to. This step is in the factory service manual so I figured it would be important and it's quick and easy to do. Skip this at your own risk.)
1.) Place your car on ramps, or put the front end on jack stands. There's a how-to for doing this.
2.) Remove the airbox intake duct by taking out the two plastic clips circled in red. Depending on your year model, they will either be phillips or flat head:
3.) Remove the two upper radiator brackets by removing the two 12mm bolts circled in red. Not shown, but loosen the two clamps at the ends of the airbox's accordion duct. No need to remove them or the duct:
4.) Remove the intercooler. Accomplish this by removing the two 12mm bolts holding the BPV as well as the two 12mm mounting bolts at the ends (all four circled in red. Loosen the two clamps circled in blue (can be done with a phillips or 10mm socket, I believe). Finally, remove the three breather lines from the breather tube (circled in yellow). Just pull and they slip off. Finally, remove the IC by pushing towards the firewall until the TB connection is out, then pull towards the drive side to pull it off the turbo. Be careful of the fins, and set it aside:
5.) Unbolt the lower pitch stop bolt. Now that the IC is out of the way, access is easy and it is circled in red. Use a 14mm wrench on the nut with a 14mm socket and breaker bar on the bolt head. Once loose, remove the bolt and tilt the pitch stopper up as far as it can go:

6.) Now under the car. Remove the under tray. It's held on with three 12mm bolts, two push clips in the wheel wells (use the flat head to carefully pry up the head of the clip), and two slide on clips at the back to the sides of where the rear 12mm bolt was.
7.) Remove the subframe lower brace as seen here. Ten total bolts, all 14mm (two have 14mm nuts) and you may need your impact/breaker bar. There are four center bolts as circled below (note that the forward two have a nut instead of threads into the subframe):
And six outer bolts (drive side show):

8.) Remove front swaybar D-brackets by removing 12mm bolts and 12mm nuts (one each per side, shown below on driver side):
Then swing the entire swaybar down:

9.) Using your impact or breaker bar and the 14mm deep socket, remove the two 14mm nuts from the bottom of the engine mounts, circled in red:
10.) Now, using a jack with a block of wood, jack up the motor by the oil pan until the studs clear the subframe. I can tell you the first thing to bind will be the AC line that curves around the air pump on the driver's side by the battery. You shouldn't have to go that high though. It is good to have a spotter watching around in the engine bay just in case. If you have it on ramps, at first while jacking the car will rise as the suspension lifts while the weight of the engine is taken from it. Don't be alarmed as it is not stuck (as long as you followed the above steps). Keep going and you will see the engine lift. Take a jack stand and block of wood and put it under the transmission oil pan to offer some protection from the jack falling.
Here is an optional alternative method to protecting yourself. You can take the nuts and screw them onto the shaft on the engine side. This way, if the jack fails, the stud and nut will catch the engine. This is only effective if you only remove one mount at a time (which you should do anyway).
11.) Pick a side to start on. With the engine high enough, use your breaker bar to take out the forward 14mm bolt holding the mount bracket to the engine:
12.) Now, do the same for the rear. Here you will have to use the 14mm flex head ratcheting wrench. This single tool makes this job easy. If you need extra torque to break it free, put another solid box end wrench on the open end to give you more leverage. Once it is removed you can now remove the bracket and mount together. Below are pictures of the rear bolts to help you find them. I can tell you the driver side is the harder since the steering column and rack are more in the way.
Driver side:
Passenger side:
13.) Install your new motor mount into the car for that side, then repeat step 12 for the other side.
14.) Once you're all bolted up (see below for torque values), you can lower the motor. Don't forget to take the nuts off the studs if you were using them as a safety device. Also don't forget to remove the jack stand from the tranny pan.
If you find the studs are too far back and won't align with the slots in the subframe as you lower the engine, here's a trick. Lay under the driver side, but be sure to keep your hands nice and clear of any pinch areas. Have the motor lifted so the studs are just slightly above the subframe with your buddy operating the release. Stick the breaker bar between the driver's side manifold and the subframe and pry the engine forward. Once it's roughly aligned, tell your buddy to VERY SLOWLY lower the engine. Everything should go together fine.
Now put everything back in reverse order of above. Pertinent torque values are below.
Happy motoring and enjoy your new mounts! :tup:
Upper radiator brackets: 8.9 ft-lbs
Pitchstop lower bolt: 36.9 ft-lbs
Lower subframe brace bolts: 44.3 ft-lbs
Front swaybar D-bracket bolts/nuts: 18.4 ft-lbs
Engine mount bracket to engine bolts: 25.8 ft-lbs
Engine mount to bracket nuts: 31.0 ft-lbs
Engine mount to subframe nuts: 62.7 ft-lbs


