IW STi Forum banner

Rear Wheel Bearing

120K views 52 replies 33 participants last post by  SolidSTI  
#1 · (Edited)
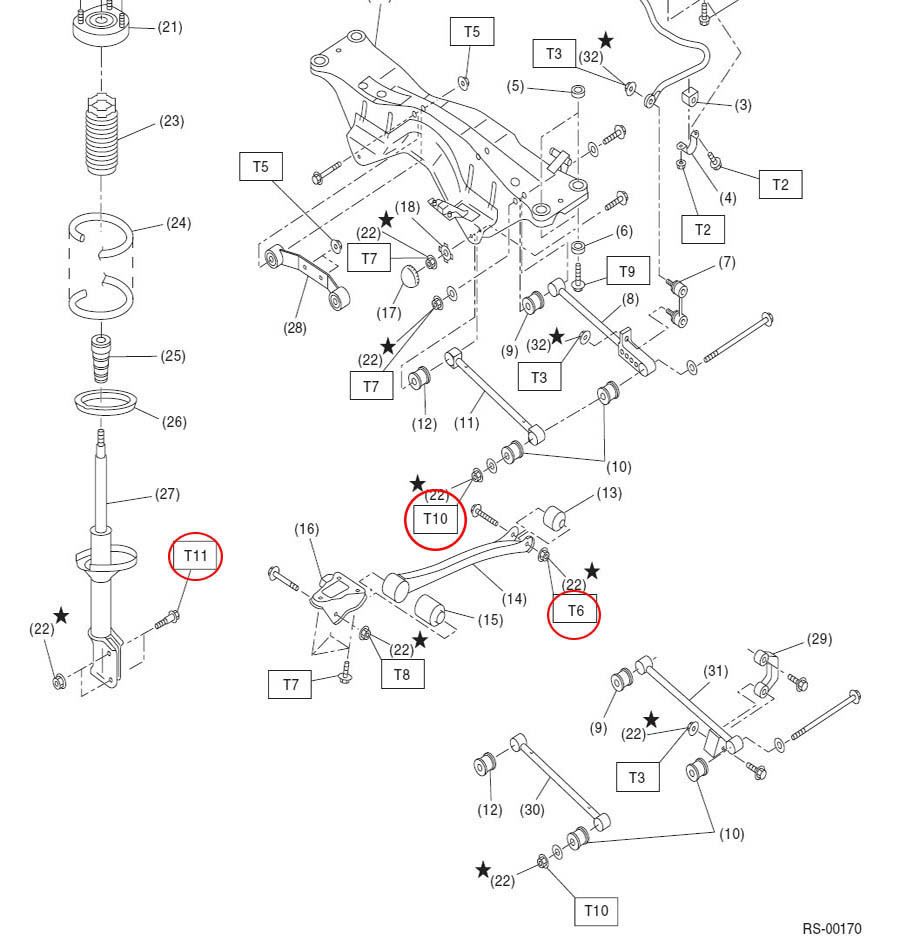
Rear Wheel Bearing R&I (as wrenched on an 07 WRX STi)

My wheel bearing cage was pretty much destroyed. When I pressed it out there was about 5 rollers not secure in the cage and further inspection showed the cage was gouged and badly damaged

Image


Tools:
- 32mm Socket (axle nut)
- 19mm, 17mm, 14mm (suspension, and brake parts)
- Needle nose
- Rackets, breaker bar
- Torque wrench
- Access to a press
- I used a 36mm to press the bearing
- 26-27 mm for the hub

Parts
- Check with your local Subaru dealer
- Or use online sites or vendors!

Parts I Used
- Rear Wheel bearing - #28016PA010
- Oil Seal #1 - #28015AA080
- Oil Seal #2 - #28015AA070
- Rear Axle nut - #28044AA001

Credit

- My friend Marc (camera man)
- Great sites like these
- Hotrodguru for letting borrow some pics

As always...
DISCLAIMER: WORKING ON YOUR CAR IS DANGEROUS. IF YOU FEEL YOU CANNOT COMPLETE ANY OF THESE TASKS, DON'T DO IT, THESE PARTS HOLD YOUR SUSPENSION AND WEIGHT OF YOUR CAR. THIS IS A REFERENCE ONLY! do not attempt. I am ZERO % responsible for your mishaps
 
#2 · (Edited)
Re: How To: Rear Wheel Bearing

Rear Wheel Bearing Install

- First you need to break the torque on your lug nuts
- Get your rear in the air and stable (your going to put some stress on some parts)
- Remove your wheel

Image


- Locate your axle nut and "uncrimp" it
- After its uncrimped, make sure you have your parking brake on realy good.
- Either break the torque on it and back it off so its hand tight accessible, or remove it all together

Image


- Now, located behind everything are two bolts holding your caliper on. Remove two bolts and set bracket aside. (Make sure your caliper is in a safe place, not dangling around)

Image


- Release your parking brake, and remove your rotor (If you have difficuly removing it, try setting your parking brake a couple times up and down. If that does not work you have to have two 8 mm bolts in the two threaded slots)

Image


- Remove the ABS sensor that is held on by one bolt. It is located behind the backing plate

Image


- Now the fun part, messing with your parking brake assembly

Image


- You need to get the parking brake cable out of there first. On the back side you can see where the cable enters. Theres is a Clip that holds it in, remove clip
- Now Since your tearing the assembly apart, you can go to town on it! Remove the two shoe hold down springs by using the proper tool for drum brakes, or just use some needle nose and press down on the spring while twisting to get the plate and spring off the pin
- Remove the Primary and Secondary return springs, along with the shoe guide plate
- Remove the bottom spring which is the adjusting spring
- Now everything will kind of fall apart on you, but down worry later on I will tell you how to assemble it back together

Image

(lever is the one with the arrow pointing from the grease gun)

- Remove the two shoes along with the strut piece and spring. The Lever has a notch on the bottom that holds the parking brake cable onto. You have to compress the long spring thats on the cable to separate it from the Lever
- Fish the cable from the back of the Backing plate and let it dangle
- Set everything aside neatly (Neatly as in aside somewhere where it wont get messed with. You don't want to lose any small parts)
- Now these next three steps don't relay matter on what order, just as long as they disconnect front the knuckle housing
- Remove bolt on lateral link

Image


- Remove bolt (relay long one) on your parallel links

Image


- Break torque on the two bolts that are on your strut but leave one in to hold it for now
- Now at this point, double check everything to make sure everything is disconnected
- Make sure your axle nut is off and remove the last bolt holding from your strut.
- Now just wiggle the whole assembly out of there slowly. Don't let your axle just rest down on its own, place something below it like a piece of wood to support it

Image
 
#3 · (Edited)
Re: How To: Rear Wheel Bearing

Rear Wheel Bearing Install

- Look behind the housing and remove the oil seal. (Make note of which way it goes in)
- Now make your way to a press
(IF YOUR USING A PNEUMATIC, PNEUDRAULIC OR HYDRAULIC PRESS, KEEP A GOOD EYE ON THE GAGE AND DO NOT EXCEED EXTREME PRESSURE. On the press I was using, I made sure I did not go above 10-15 tons)

- You need to press your Hub out first (Inside Out) Use a socket that is a close diameter to your hub. I used a 27mm Deep well socket
- Since the bearing is two tapered roller bearings, in one, one side will be pressed into your hub still. You need to press it out and use a bearing separator

Image


Image


- Remove the oil seal.
- Take a look fron the front side and you will see a snap ring. You will need to remove that. I used a medium sized flat tip screwdriver to compress and pry it out

Image


- Press your bearing out (Inside out) I used the 36mm socket
- Ok now your bearing is out! Make sure your knuckle housing is in good condition. Clean, measure X and Y with a caliper, an inside micrometer or what ever you have, and make sure they aren't more than .020mm (0.0008 in) difference. (if they are, replace housing or it can cause another bearing to go bad)
- You can remove your backing plate if you want. Its held on by four bolts (I did for more maneuverability on the press)
- Ok your ready to press in your new bearing. KEEP THE BEARING STAY IN THERE!(the plastic piece holding from the inner race's) Press the bearing (Outside in) use the proper size fitting (I started it in with the plate, then switched to a 36mm socket later)

Image


Image


- You will know when the bearing is pressed in all the way because you can see where the snap ring goes (IF YOUR USING A PNEUMATIC, PNEUDRAULIC OR HYDRAULIC PRESS, KEEP A GOOD EYE ON THE GAGE AND DO NOT EXCEED EXTREME PRESSURE)
- Install snap ring, and you can either press in the oil seal until it seats against the ring, or "Hand" press it in like I did
- If you removed your backing plate, You need to install it now
- Press your hub in to the bearing now. This part is tricky.
- The inboard side of the bearing will need to be supported by a 36mm socket.
- Press the hub into the bearing (Outside in)
- It will take the place of the bearing stay, which is holding the two bearings together
- Make sure there is room for the bearing stay to get pressed out, while the hub gets pressed in

Image


Image
 
#4 · (Edited)
Re: How To: Rear Wheel Bearing

Rear Wheel Bearing Install

- Now make your way back to your car and install your housing/hub
- The hub is splined so wiggle it so the axle slides through it and Begin assembly
- I hand tightened the strut bolts, parallel links, and lateral link in
- Fish the parking brake cable through the backing plate
- Now that everything is good from here, torque down everything to specs
- I do not have any good pictures of the parking brake assembly so I'm going to try to explain it. This is a lot easier with two people. Here is the handy pic again of all the parts

Image


- One of your shoes ( Right side will have the lever on the rear side) Get your cable over the notch

Image


- Get your shoe that has the lever on it and "install it" against the thing sticking out, the anchor (where it pivots). Get your strut piece and spring and install the notch in the shoe
- Now get your other shoe and "Install" (make sure the strut piece notch sits in the shoe) and install your shoe guide plate, primary and secondary springs
- Next install your adjusting spring
- Install your Adjuster
- Install the two shoe holder springs
- INSTALL THE CLIP ON THE BACK SIDE OF THE BACKING PLATE TO HOLD THE CABLE DOWN!

Image


- You can double check to see if your parking brake works.
- Have someone apply the parking brake and you should see the primary shoe move only (secondary very very little) Once your rotor is on they both will clamp
- It will feel loose because there is nothing to clamp down to. aka, your rotor
- Return parking brake down
- Install rotor
- Place bracket behind the backing plate and install caliper, Torque two bolts 50 ft lbs
- Now Apply your Parking brake hard
- Torque down your axle nut 140 ft lbs and crimp by using a punch (preferably brass), and a hammer.
- Torque strut bolts, parallel links, and lateral link

Image


- Double double check everything to make sure its on
- Install wheel, lower car, torque lug nuts to 70 ft lbs

- Double check to make sure your parking brake works. It should be about the same if you did not destroy, or mess with any components

Image

Image
 
#5 · (Edited)
Re: How To: Rear Wheel Bearing

Here is the old bearing to show it a little more detail

Its two tapered roller bearings in one housing

Image


I just sandwiched them together. (The plastic piece is the bearing stay, It holds the two bearings together)

Image
 
#7 ·
Re: How To: Rear Wheel Bearing

To quote my self a while back, here were my symtoms:

hit my rear passenger wheel against the transition between the dirt field and the road. sounded like a shotgun going off. Since then I have been getting some sounds. Most noticeable above 40+mph, the whole car is very noisy. At around 50-52mph it makes a "whom whom" sound, but only at that specific speed. And... around 70+ I get a high pitch whine randomly while driving strait. It comes and goes randomly.

The wheel looks pretty strait from the eye, but I rotated with my front wheel and the noise is still coming from the rear.

While rotating the tire i looked pretty hard at everything and it all is strait and no bend/stress marks. The car still drives very strait. No weird tire wear.

Even did the 12 o'clock push pull (and every other position) and nothing moved. its solid

I read that the high pitch whine noise could be coming from a wheel bearing slowly shifting moving the hub thus causing the rotor to move a small amount against the brake pads. I will do the check this weekend when I have some time.
That was a while back, but the sounds were now apparent at 20+mph speeds. They were like howling , whom whom sounds.
 
#46 ·
#12 ·
Re: How To: Rear Wheel Bearing

:) I used to know hangul back in the day when I was like 5, but not speaking or writing it I lost it :(

Damn, have fun doing both man. Atleast when your done with one side, the other will take half the amount of time (should) :)
 
#15 ·
Re: How To: Rear Wheel Bearing

I just have to say that this is an excellent write-up. I followed it step by step and it worked perfectly. Thanks GOSU. I do have some advice for anyone who is going to do this. When I was re-installing the brake shoes for parking brake assembly, I was having a hard time installing the shoe hold down pins (small springs with the hats). To make this step much easier I simply compressed the springs with pliers and then zip-tied them with small plastic ties. Then I installed the compressed springs with the small hat and then cut the plastic ties and pulled them out with needle nose pliers. It worked like a charm and prevented a big headache.
 
#17 ·
Re: How To: Rear Wheel Bearing

Hey gosu,
This is a great write up.
I just ordered the parts you listed for my 2005 STi rear hub.
I could not find any information anywhere to the contrary so I wonder if you could confirm that the parts are the same between 2005 and 2007 ?
Just ordered the parts this morning so let me know if you happen to read this today.
Thanks!
 
#20 ·
Re: How To: Rear Wheel Bearing

PM'd! I have been gone for a long while, so all who PM'd me questions about the install, feel free to hit me up again if you still have problems
 
#21 ·
Re: How To: Rear Wheel Bearing

great write up i may do this soon, so far no questions, but i'll be back if i need too
 
#23 ·
I was wondering if someone could answer a question, I had most of the work done at a Subaru dealer since I didn't have access to a shop with a press, however I ended up having to replace a hub. So right now the race is in, one of the bearings (outer) but not the inner bearing. It appears he got it all together without using the bearing stay. Now I have access to a press tonight and I was wondering if I could just press the hub through, then press the other bearing on the backside on?

Thanks
 
#25 ·
Great write-up. I'll be doing this soon. Left rear bearing is done, but I'll just replace both to be safe. Taking the hubs to a shop to have the old bearings pressed out and new bearings pressed in. I'll try to post any different observations/annoyances/tricks.