

The Following is a DIY guide to repair stripped threading on a front brembo brake caliper on the STI.
Subaru utilizes a steel (19mm) bolt to fasten into the aluminum caliper. The dissimilar metals are subject to 'galvanic corrosion' where the aluminum 'bonds' to the steel. So when you go to take these bolts off, often the aluminum threading in the caliper comes out with them, and wala, the threads are gone and you're kinda screwed (ha). But a helicoil thread repair kit can save your arse.
Another part of the problem maybe that these bolts are often incorrectly over-tightened to 114ft.lb. of torque, whereas they only need to be fastened to 80 ft.lb.
-------------- Brief Instructions--------------
(1) Park car, secure and jack up front end
(2) Remove front wheels
(3) Detach brake line from caliper and remove caliper
(4) Use helicoil kit to repair/restore damaged threads.
(5) Re-install.
***I chose to install stainless steel brake lines in the same sitting.
---------------Tools required---------------
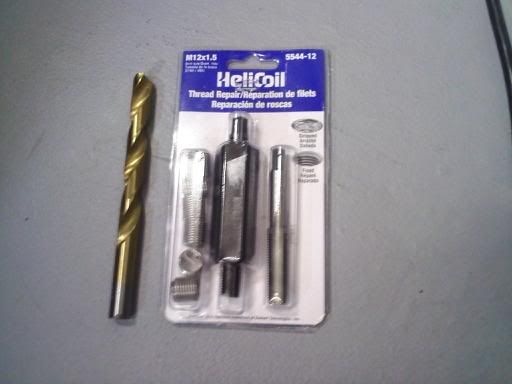
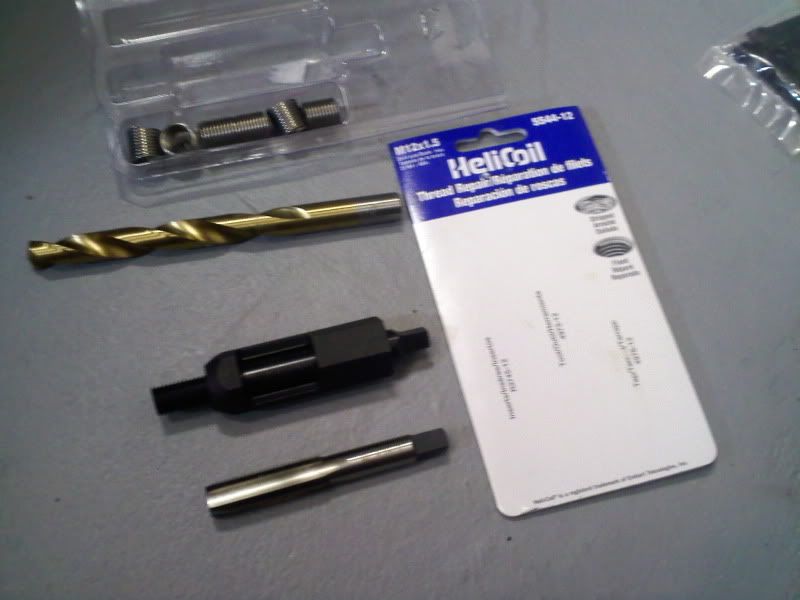
(1) Drill press with collet that will accept a 31/64 drill bit.
(2) Helicoil #554412 kit (M12 x 1.5 x 18mm thread repair kit) ***18mm means the length of the inserts once they’re installed. In the package, they’re like 1 cm long uninstalled.
![Image]()
![Image]()
(3) Jack, jack stands, wheel blocks.
(4) Socket wrench.
(5) Sockets (6-point preferred): shallow/regular 19mm, and 12mm.
(6) Permatex red thread locker. This is carried at most regular auto stores. There is a high-temp version available which is good to 450F, but you’ll have to find it or order on the internet.
(7) ***Optional*** Impact wrench - air or electric. I could only get the stripped/seized bolts out with my electric impact. I bought mine at harbor freight for like $40.
(8) Breaker bar
(9) Socket swivel adaptor
(10) Small vise-grip pliers x2 (one for gripping whatever, other for pinching brake line).
(11) Spray bottle with soapy water.
(12) Paper towels/rags.
(13) Irwin quick grip handi-clamps x2 (12 inch).
(14) 1 foot piece of 2x4 lumber.
(15) Blue painter’s tape.
(16) Simple Green/degreaser/cleaner.
(17) Old tooth brush
(18) PB blaster/peneterating oil/cutting oil for tapping
(19) Pieces of cardboard/old box
(20) Wood shims
(21) Safety goggles/eye protection
(22) Needle nose pliers
(23) i almost forgot, the 31/64 drill bit (it doesnt come with the helicoil kit)
--------------- Detailed Instructions ----------------
(1) Park car on level surface, in gear.
(2) Slightly loosen front lug nuts
(3) Block back wheels, jack-up front end of car, apply jack stands to appropriate places. ***Do not apply emergency brake as you will need to detach brake lines from calipers and if the e-brake is engaged it will pressurize the system and possibly cause over-leakage while doing so.
(4) Remove wheels
(5) Detach brake line mounting from strut with 12mm socket.
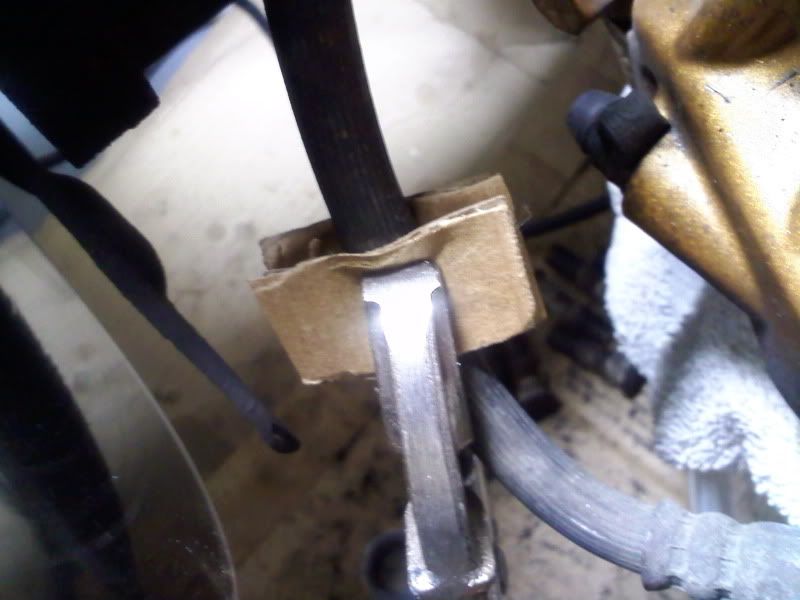
(6) I Used a small vise-grip plier to pinch the end of the stock brake line so as little fluid as possible would drain-out when the end is detached. I used some cardboard around the brake line, then the vise-grips. Don't pinch it too tight where you might damage the line.
![Image]()
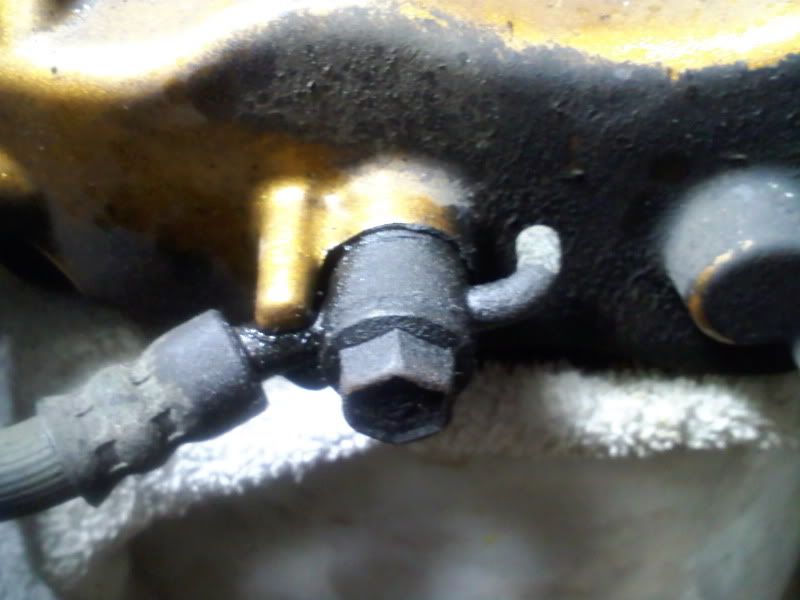
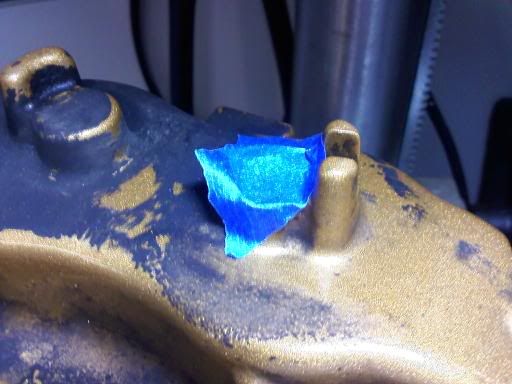
(7) Detach the brake line from the back of the caliper by loosening the 12mm banjo-bolt. Don’t lose the 2 small metal washers. A small amount of brake fluid will drip out. Don't get this on anything - clothes, paint, caliper powder coat. Use a spray bottle filled with soapy water to spray everything down the brake fluids gets on, and then wipe off with paper towels. I then covered the hole in the caliper with some blue painter's tape to prevent further leakage out.
![Image]()
![Image]()
(8) Loosen the two 19mm bolts attaching each brembo caliper to the knuckle. If your bolts are 'frozen-into' the caliper, they will be very difficult to remove. You'll get the same sensation that you're crossthreading them, which you basically are… i.e.- the aluminum that’s stuck to whatever part of the bolts' threading is botching any good aluminum threads as the bolt screws out. I had trouble getting to the top bolt because of the nuts/bolts attaching my coilover to the knuckle were in the way, so I had to put the socket onto the bolt by hand, attach the swivel adaptor, and then the socket wrench/breaker bar/impact. Be careful once the bolts are almost out, the caliper can fall to the ground! If it does, say goodbye to that nice powder coating (chips/flakes off). I had a short bucket turned upside down with a rag on top ready behind the knuckle to be able to set it on it if you need to.
THE MOMENT OF TRUTH Now you’re ready to closely examine the caliper mounting hole threading to see if you’re in the club, or not (hope you're not!). If the bolts came out seemingly normal, and with no damage, consider yourself lucky, they're probably fine, but double check the caliper hole threading anyhow. I would also suggest using a good/new bolt to thread in/out to check. I would imagine if there was only minimal damage to the threads a re-threader or thread chaser could be used to reshape any damaged threads. If yours are OK, you can read no further; if they're crapped-up, continue.
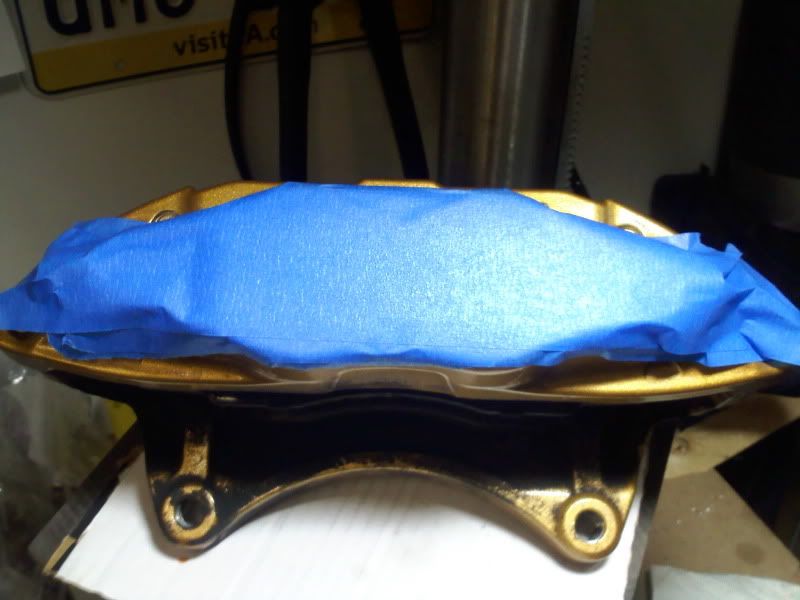
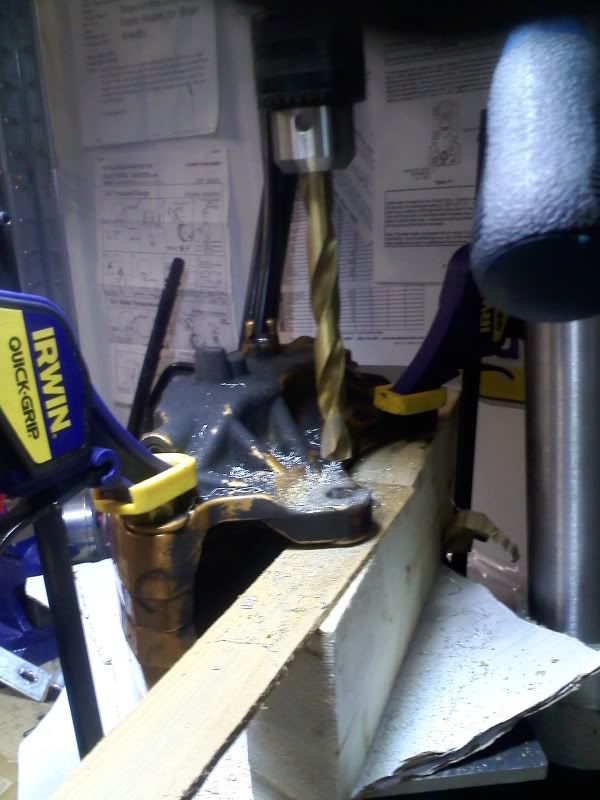
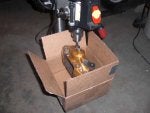
Apply blue tape to the front surface of the caliper for protection. It will be facing down on the drill press sitting on a cardboard squre.
![Image]()
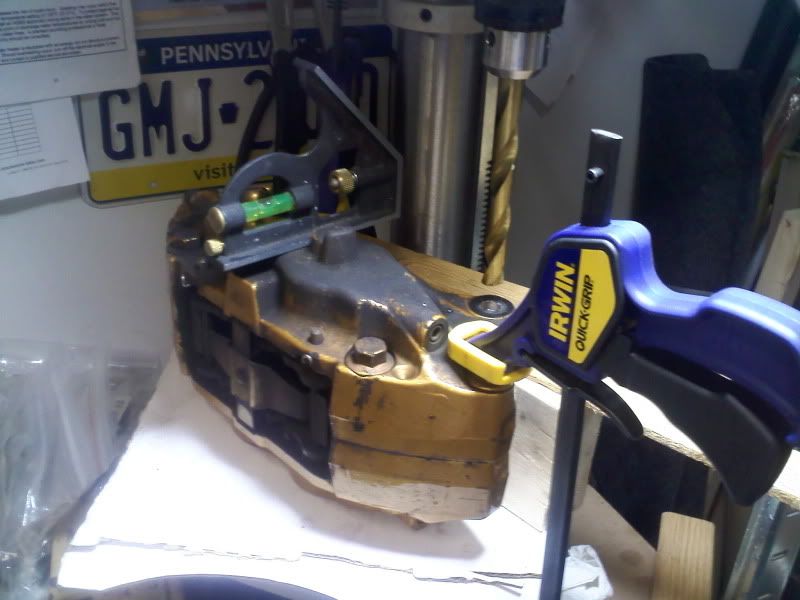
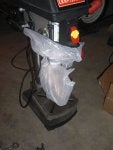
(9) Get your drill press setup. Make sure it’s level, and the bit is plumb. This is extremely important so the hole you’re reaming is not skewed, and so the rest of the repair will work! If the drilling, tapping, and helicoil-ing is not done exactly where it needs to be, it won’t match the mounting holes on the knuckle.
I used the level from a combination framing square to check that the press table was level, and needed to use some wood shims underneath the press feet to make everything perfect. I placed a small cardboard square on the drill press’ table to protect the caliper. I used a piece of 2x4 to help stabilize the caliper. Get the caliper into position for drilling, then clamp-down the caliper. Also use the level to make sure the caliper is level, on the level drill press. Use wood shims above/below the 2x4 around the caliper as needed.
(10) Crank-down/lower the drill bit several times to make sure it is drilling into the hole dead center based on where you have it clamped-down. Lower the bit to the point of where it is barely contacting the caliper and then turn the collet/bit by hand watching the very edges of the bit rotate against the edges of the caliper hole it will be reaming to make sure it is perfect. If it looks good, you're ready to drill the hole. Take your time and advance in/out several times as you work your way all the way through the hole. Wear your safety goggles and blow away the shavings as you pass in/out. The aluminum is soft and the bit should go through no problems.
![Image]()
![Image]()
![Image]()
![Image]()
![Image]()
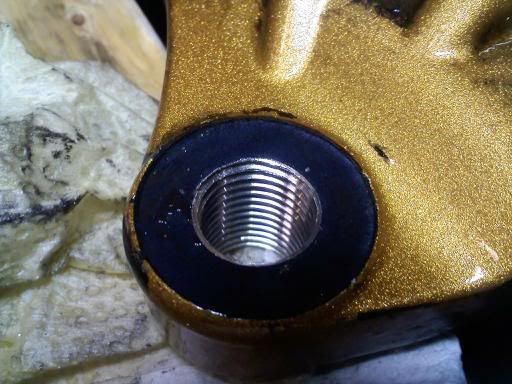
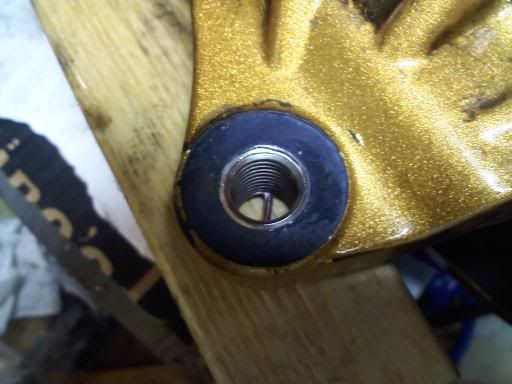
Picture of the stripped threads pre drilling:
![Image]()
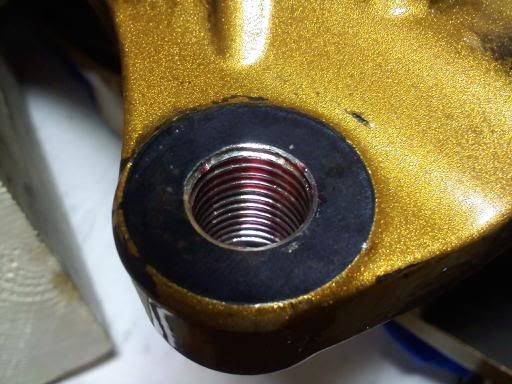
After drilling:
![Image]()
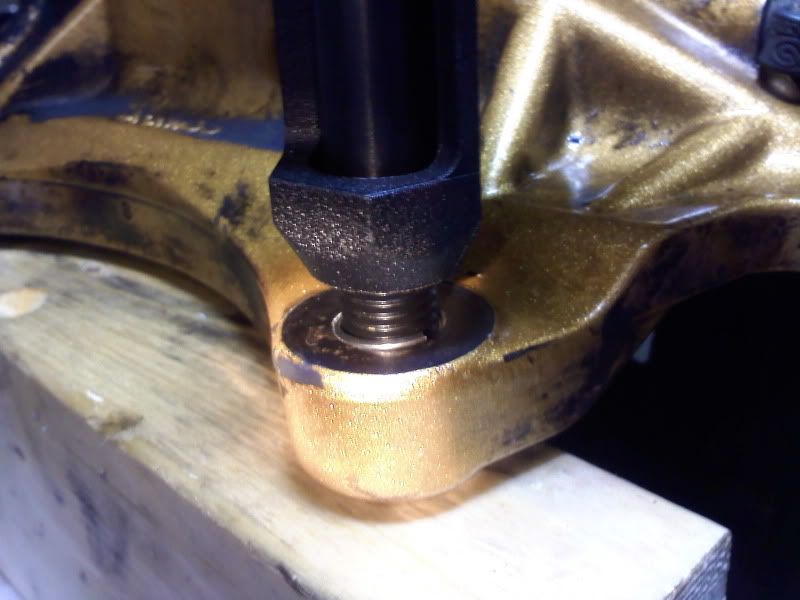
(11) Now you're ready to tap the new hole with the included tap. ***A tap-vise/tool is not included with the helicoil kit. I guess a vise-grip plier could be used to hold it. I used my tap-vise from another tap & die kit I have. ***It is essential that the hole being tapped is as straight/plumb as possible. Take your time and step back and eyeball-it from different angles to make sure it looks straight/plumb. Advance & back-out after every few turns to remove shavings by spraying with a squirt of penetrating oil or blowing/brushing off. Make sure to go all the way down so that the tapered ends of the tap pass through (beyond) the bottom of the hole until the regular (wide) part of the tap is tapping the end of the hole. If you don't advance the normal (wide) part of the tap far enough, there wont be enough adequately formed threads for the heli-coil insert to thread-into (it wont pass through). I used plenty of PB blaster to periodically spray & lubricate the tap periodically.
![Image]()
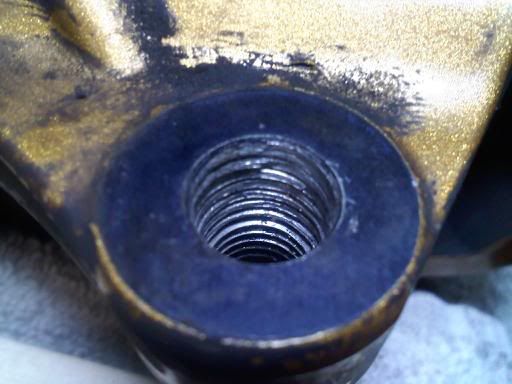
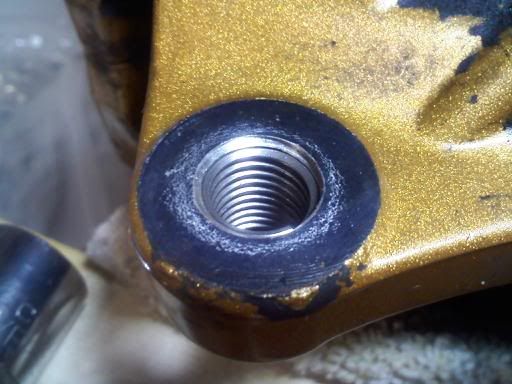
After tapping:
![Image]()
(12) Clean the cutting oil/PB blaster out of the freshly tapped threads with some simple green and an old tooth brush. Wipe out with a paper towell/rag. Clean/blow-out any residual water/lint. The threads are now nice and clean, and ready for application of the threadlocker. Apply a few drops of threadlocker.
![Image]()
(13) Now you're ready to install the heli-coil. Follow the instructions provided with the kit and diagram. The first one is an anxious moment, but then the rest go very smooth. Insert the helicoil into the large, long, hexagonally shaped what I will call "heli-coil holder" plastic part. Just slide it in, make sure its sitting in the bottom like it should. Then, thread what I will call the black "heli-coil introducer thing" through the "holder" and into the heli-coil, as shown, I used a small vise-grip to hold the end; alternatively, I could have used the tap-vise.
![Image]()
Now Place the heli-coil apparatus ("holder" + "introducer") over the tapped caliper hole. Use one hand to hold the "holder", and the other will turn the "introducer" which will then thread the helicoil into the hole. Hold the "holder" firmly against the caliper and maintain some pressure and slowly start to screw the heli-coil in by turning the "introducer". (The "holder" remains stationary). As the firts few heli-coil threads thread-into the hole it feels tough, kinda like its possibly crossthreading, but that's normal. As the heli-coil starts to engage a few threads it will then seem to start threading-in easier. At that point you only need to loosely hold the "holder".
![Image]()
Keep threading it in until it looks like below (almost all the way in). Turn a few more times until the very end (tpp) of it is 1/4 to 1/2 turn into/below the edge of the tapped threads in the caliper hole. Also turn the caliper over and check the underside of the hole to make sure you havent threaded the insert in too far (through). The bracket/hole is roughly 20mm deep whereas the insert expands to 18mm when inserted, so there should be about 1mm of tapped threading above/below the inserted heli-coil. So it should be right in the middle of the tapped threads with about 1mm of threads left on either side (It's almost all the way threaded-in in the picture below).
![Image]()
***If you sense any significantly abnormal resistance while you're threading the heli-coil in, abandon that heli-coil, and remove it. Stop advancing the "introducer" + heli-coil, and unscrew the "introducer " from the heli-coil. It will screw right out of it and the heli-coil will stay in the hole where you left it. Pull it out with a needle-nose plier. Do this by grabbing the tang. It will un-coil. At that point double-check the tapped threads with your tap. If the tapped hole is ok, it was probably some odd problem with that specific heli-coil you were installing or it wasn't being inserted perfectly right. Start over with a fresh heli-coil. This happened to me on one of mine and the 2nd time it went in fine.
When the heli-coil is in the appropriate place it should look like this:
![Image]()
The "tang" (end/bottom of the coil) will still be attached at the bottom and need to be knocked-off per the instructions. I used the end of a drill bit that fit nicely into the hole.
![Image]()
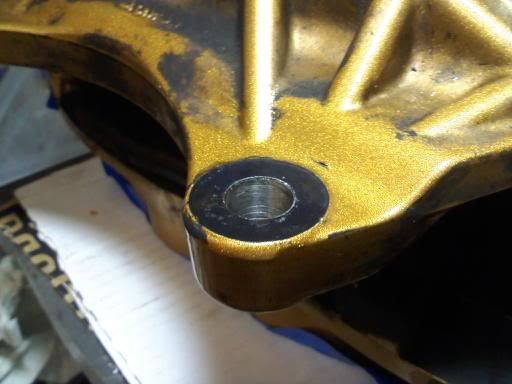
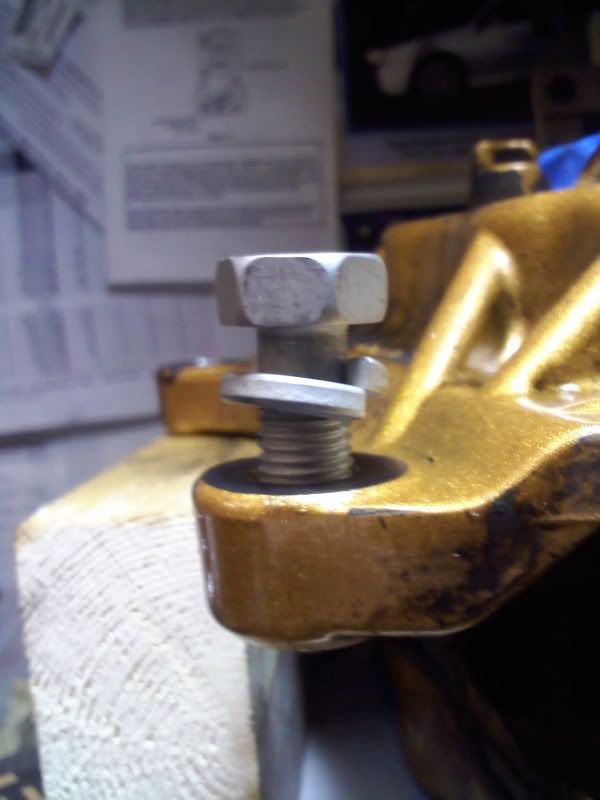
(14) Test-fit with one of the 19mm bolts, wipe off any excess threadlocker if needed. Remove the bolt and let dry overnight. Then you're done, caliper is ready for re-installation... remember only to torque the bolts to 80 ft.lb. when reinstalling on the knuckle.
![Image]()
Good luck!
Subaru utilizes a steel (19mm) bolt to fasten into the aluminum caliper. The dissimilar metals are subject to 'galvanic corrosion' where the aluminum 'bonds' to the steel. So when you go to take these bolts off, often the aluminum threading in the caliper comes out with them, and wala, the threads are gone and you're kinda screwed (ha). But a helicoil thread repair kit can save your arse.
Another part of the problem maybe that these bolts are often incorrectly over-tightened to 114ft.lb. of torque, whereas they only need to be fastened to 80 ft.lb.
-------------- Brief Instructions--------------
(1) Park car, secure and jack up front end
(2) Remove front wheels
(3) Detach brake line from caliper and remove caliper
(4) Use helicoil kit to repair/restore damaged threads.
(5) Re-install.
***I chose to install stainless steel brake lines in the same sitting.
---------------Tools required---------------
(1) Drill press with collet that will accept a 31/64 drill bit.
(2) Helicoil #554412 kit (M12 x 1.5 x 18mm thread repair kit) ***18mm means the length of the inserts once they’re installed. In the package, they’re like 1 cm long uninstalled.
(3) Jack, jack stands, wheel blocks.
(4) Socket wrench.
(5) Sockets (6-point preferred): shallow/regular 19mm, and 12mm.
(6) Permatex red thread locker. This is carried at most regular auto stores. There is a high-temp version available which is good to 450F, but you’ll have to find it or order on the internet.
(7) ***Optional*** Impact wrench - air or electric. I could only get the stripped/seized bolts out with my electric impact. I bought mine at harbor freight for like $40.
(8) Breaker bar
(9) Socket swivel adaptor
(10) Small vise-grip pliers x2 (one for gripping whatever, other for pinching brake line).
(11) Spray bottle with soapy water.
(12) Paper towels/rags.
(13) Irwin quick grip handi-clamps x2 (12 inch).
(14) 1 foot piece of 2x4 lumber.
(15) Blue painter’s tape.
(16) Simple Green/degreaser/cleaner.
(17) Old tooth brush
(18) PB blaster/peneterating oil/cutting oil for tapping
(19) Pieces of cardboard/old box
(20) Wood shims
(21) Safety goggles/eye protection
(22) Needle nose pliers
(23) i almost forgot, the 31/64 drill bit (it doesnt come with the helicoil kit)
--------------- Detailed Instructions ----------------
(1) Park car on level surface, in gear.
(2) Slightly loosen front lug nuts
(3) Block back wheels, jack-up front end of car, apply jack stands to appropriate places. ***Do not apply emergency brake as you will need to detach brake lines from calipers and if the e-brake is engaged it will pressurize the system and possibly cause over-leakage while doing so.
(4) Remove wheels
(5) Detach brake line mounting from strut with 12mm socket.
(6) I Used a small vise-grip plier to pinch the end of the stock brake line so as little fluid as possible would drain-out when the end is detached. I used some cardboard around the brake line, then the vise-grips. Don't pinch it too tight where you might damage the line.
(7) Detach the brake line from the back of the caliper by loosening the 12mm banjo-bolt. Don’t lose the 2 small metal washers. A small amount of brake fluid will drip out. Don't get this on anything - clothes, paint, caliper powder coat. Use a spray bottle filled with soapy water to spray everything down the brake fluids gets on, and then wipe off with paper towels. I then covered the hole in the caliper with some blue painter's tape to prevent further leakage out.
(8) Loosen the two 19mm bolts attaching each brembo caliper to the knuckle. If your bolts are 'frozen-into' the caliper, they will be very difficult to remove. You'll get the same sensation that you're crossthreading them, which you basically are… i.e.- the aluminum that’s stuck to whatever part of the bolts' threading is botching any good aluminum threads as the bolt screws out. I had trouble getting to the top bolt because of the nuts/bolts attaching my coilover to the knuckle were in the way, so I had to put the socket onto the bolt by hand, attach the swivel adaptor, and then the socket wrench/breaker bar/impact. Be careful once the bolts are almost out, the caliper can fall to the ground! If it does, say goodbye to that nice powder coating (chips/flakes off). I had a short bucket turned upside down with a rag on top ready behind the knuckle to be able to set it on it if you need to.
THE MOMENT OF TRUTH Now you’re ready to closely examine the caliper mounting hole threading to see if you’re in the club, or not (hope you're not!). If the bolts came out seemingly normal, and with no damage, consider yourself lucky, they're probably fine, but double check the caliper hole threading anyhow. I would also suggest using a good/new bolt to thread in/out to check. I would imagine if there was only minimal damage to the threads a re-threader or thread chaser could be used to reshape any damaged threads. If yours are OK, you can read no further; if they're crapped-up, continue.
Apply blue tape to the front surface of the caliper for protection. It will be facing down on the drill press sitting on a cardboard squre.
(9) Get your drill press setup. Make sure it’s level, and the bit is plumb. This is extremely important so the hole you’re reaming is not skewed, and so the rest of the repair will work! If the drilling, tapping, and helicoil-ing is not done exactly where it needs to be, it won’t match the mounting holes on the knuckle.
I used the level from a combination framing square to check that the press table was level, and needed to use some wood shims underneath the press feet to make everything perfect. I placed a small cardboard square on the drill press’ table to protect the caliper. I used a piece of 2x4 to help stabilize the caliper. Get the caliper into position for drilling, then clamp-down the caliper. Also use the level to make sure the caliper is level, on the level drill press. Use wood shims above/below the 2x4 around the caliper as needed.
(10) Crank-down/lower the drill bit several times to make sure it is drilling into the hole dead center based on where you have it clamped-down. Lower the bit to the point of where it is barely contacting the caliper and then turn the collet/bit by hand watching the very edges of the bit rotate against the edges of the caliper hole it will be reaming to make sure it is perfect. If it looks good, you're ready to drill the hole. Take your time and advance in/out several times as you work your way all the way through the hole. Wear your safety goggles and blow away the shavings as you pass in/out. The aluminum is soft and the bit should go through no problems.

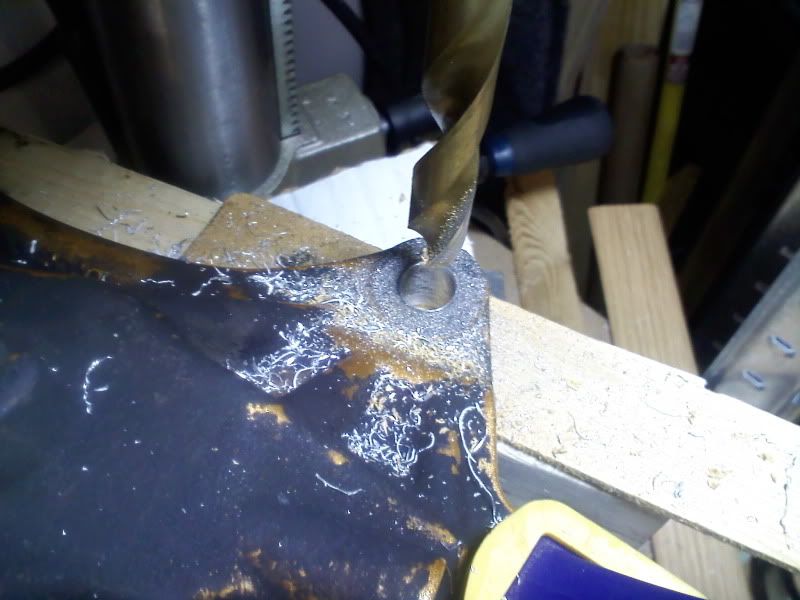
Picture of the stripped threads pre drilling:
After drilling:
(11) Now you're ready to tap the new hole with the included tap. ***A tap-vise/tool is not included with the helicoil kit. I guess a vise-grip plier could be used to hold it. I used my tap-vise from another tap & die kit I have. ***It is essential that the hole being tapped is as straight/plumb as possible. Take your time and step back and eyeball-it from different angles to make sure it looks straight/plumb. Advance & back-out after every few turns to remove shavings by spraying with a squirt of penetrating oil or blowing/brushing off. Make sure to go all the way down so that the tapered ends of the tap pass through (beyond) the bottom of the hole until the regular (wide) part of the tap is tapping the end of the hole. If you don't advance the normal (wide) part of the tap far enough, there wont be enough adequately formed threads for the heli-coil insert to thread-into (it wont pass through). I used plenty of PB blaster to periodically spray & lubricate the tap periodically.

After tapping:
(12) Clean the cutting oil/PB blaster out of the freshly tapped threads with some simple green and an old tooth brush. Wipe out with a paper towell/rag. Clean/blow-out any residual water/lint. The threads are now nice and clean, and ready for application of the threadlocker. Apply a few drops of threadlocker.
(13) Now you're ready to install the heli-coil. Follow the instructions provided with the kit and diagram. The first one is an anxious moment, but then the rest go very smooth. Insert the helicoil into the large, long, hexagonally shaped what I will call "heli-coil holder" plastic part. Just slide it in, make sure its sitting in the bottom like it should. Then, thread what I will call the black "heli-coil introducer thing" through the "holder" and into the heli-coil, as shown, I used a small vise-grip to hold the end; alternatively, I could have used the tap-vise.

Now Place the heli-coil apparatus ("holder" + "introducer") over the tapped caliper hole. Use one hand to hold the "holder", and the other will turn the "introducer" which will then thread the helicoil into the hole. Hold the "holder" firmly against the caliper and maintain some pressure and slowly start to screw the heli-coil in by turning the "introducer". (The "holder" remains stationary). As the firts few heli-coil threads thread-into the hole it feels tough, kinda like its possibly crossthreading, but that's normal. As the heli-coil starts to engage a few threads it will then seem to start threading-in easier. At that point you only need to loosely hold the "holder".

Keep threading it in until it looks like below (almost all the way in). Turn a few more times until the very end (tpp) of it is 1/4 to 1/2 turn into/below the edge of the tapped threads in the caliper hole. Also turn the caliper over and check the underside of the hole to make sure you havent threaded the insert in too far (through). The bracket/hole is roughly 20mm deep whereas the insert expands to 18mm when inserted, so there should be about 1mm of tapped threading above/below the inserted heli-coil. So it should be right in the middle of the tapped threads with about 1mm of threads left on either side (It's almost all the way threaded-in in the picture below).
***If you sense any significantly abnormal resistance while you're threading the heli-coil in, abandon that heli-coil, and remove it. Stop advancing the "introducer" + heli-coil, and unscrew the "introducer " from the heli-coil. It will screw right out of it and the heli-coil will stay in the hole where you left it. Pull it out with a needle-nose plier. Do this by grabbing the tang. It will un-coil. At that point double-check the tapped threads with your tap. If the tapped hole is ok, it was probably some odd problem with that specific heli-coil you were installing or it wasn't being inserted perfectly right. Start over with a fresh heli-coil. This happened to me on one of mine and the 2nd time it went in fine.
When the heli-coil is in the appropriate place it should look like this:
The "tang" (end/bottom of the coil) will still be attached at the bottom and need to be knocked-off per the instructions. I used the end of a drill bit that fit nicely into the hole.
(14) Test-fit with one of the 19mm bolts, wipe off any excess threadlocker if needed. Remove the bolt and let dry overnight. Then you're done, caliper is ready for re-installation... remember only to torque the bolts to 80 ft.lb. when reinstalling on the knuckle.
Good luck!


")


