

The AVCS gears on your cams play a vital role in the timing of your engine. If you have spun a bearing, your oil will be contaminated with metal. The metal laced oil will have made it's way to those AVCS gears and it could build up, possibly preventing the mechanisms inside to move freely.
Here is full description of what they do:
"DUAL AVCS (ACTIVE VALVE CONTROL SYSTEM) (FROM '08MY)
GENERAL
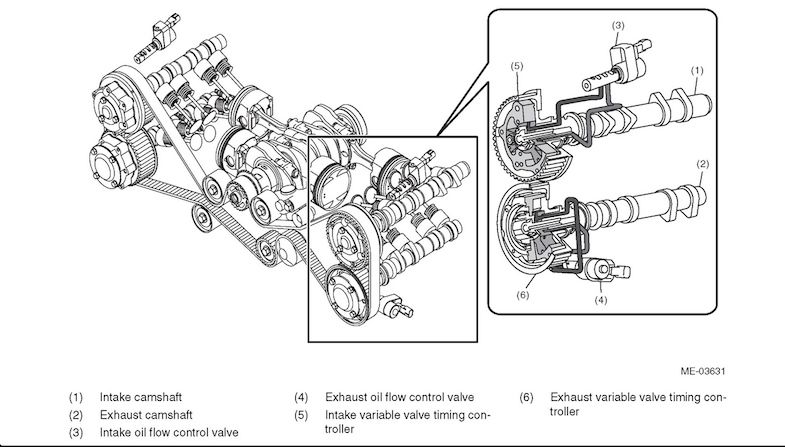
The dual AVCS (Active Valve Control System) changes the camshaft phase angle in relation to the camshaft sprocket to optimize valve timing of the intake and exhaust valves, improving torque in a low and medium speed range, output performance in a high speed range, emission performance, and fuel efficiency.
The ECM determines the best camshaft angle in relation to the crankshaft angle based on engine speed, vehicle speed, throttle angle, and other relevant parameters.
Under the control of the ECM, the oil flow control solenoid valve moves its spool to change the phase angle between the camshaft sprocket and camshaft successively by switching the oil path designed between the advance angle chamber and the retard angle chamber."
![Image]()
New AVCS gears from Subaru will be about $450+ for all four. That's a quite a bit of dough. So, you can choose to take your chances at bent valves and not clean the gears, buy brand new ones or simply clean them.
There are only a few components to each gear that can be taken apart and cleaned, so the process is rather easy. You just need to be mechanically inclined to do so, and of course, you need the right tools.
This is a "How-to" on cleaning these AVCS gears.
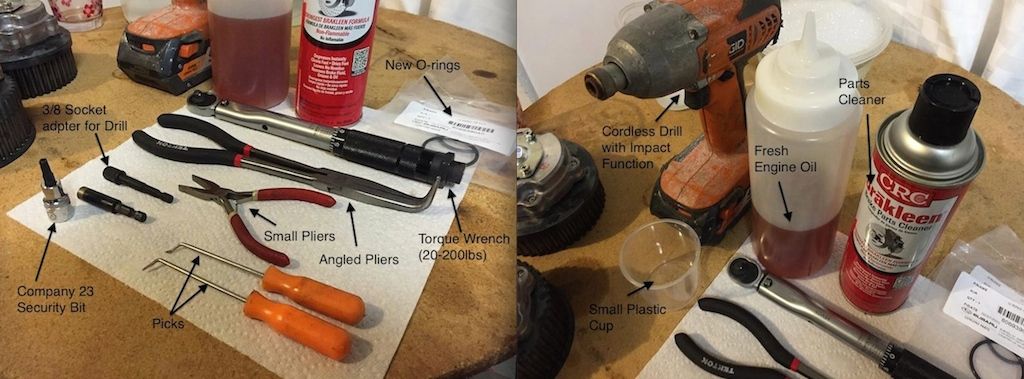
The tools you need:
1x Cordless Drill with an Impact function (If your drill doesn't have the impact function, you can buy an adapter at Lowes or Home Depot) (Drill not needed but will make the process much faster)
1x 3/8 Socket Adapter for the Drill
1x Company 23 Security Bit ($10 from Rallysportdirect)
1x Phillips Drill Bit (Or Screwdriver)
2x Picks
1x Angled Needle Nose Pliers
1x Small Pliers
1x Parts Cleaner (CRC brand is STRONG stuff, wear chemical resistant gloves and glasses for your own good!)
1x Container with Soapy Water
1x Container with Clean Water
1x Plastic Cup (NO FOAM CUPS!)
1x Paper or Plastic Plate (NO FOAM PLATES!)
1x Engine Oil (In a condiment bootle works best)
2x New OEM O-Rings #806939040
1x Torque Wrench (20-200in lbs)
1x Extra Pair of Hands (This will come in handy at the end)
You also would need compressed air and an air nozzle to dry out the components really fast, but letting them dry normally for a while is also an option.
![Image]()
Work on each AVCS individually from start to finish. There are two types of AVCS you will encounter. The Intake AVCS has 3 screws on the front and can be completely torn apart for cleaning, the Exhaust AVCS has a spring on the front, under the cover with the 4 screws. I will show how to clean the Exhaust AVCS when I edit this post.
WARNING: Subaru does NOT sell the components for the AVCS other than the O-rings. If you LOSE something, you will have to buy a new AVCS, so keep track of everything…
Note that you can easily identify the Driver side AVCS because the AVCS is mounted INSIDE the gears. The Passenger AVCS are mounted on the OUTSIDE of the gears. The Intake AVCS has a front cover with THREE screws and Exhaust AVCS has a cover with FOUR screws and a Spring inside it.
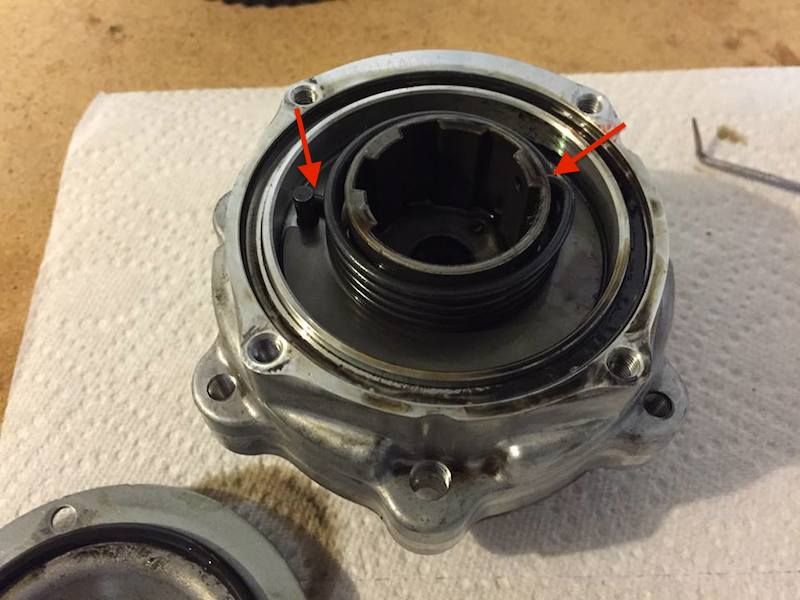
1.
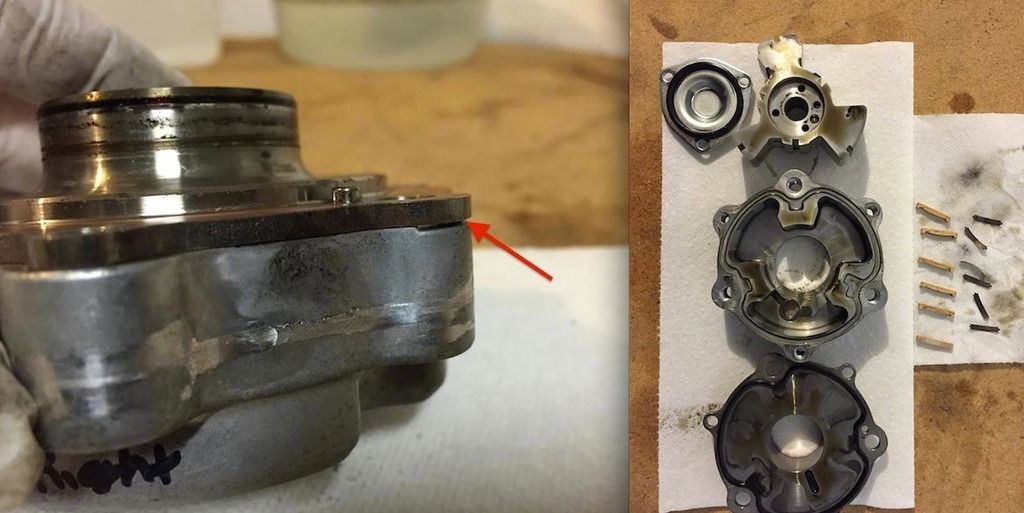
Locate the torx bolts on the back of the AVCS gear and remove all. Separate the gear from the AVCS and set it aside. Locate the slit on the side of the AVCS where the red arrow is pointing in the picture and insert a pick between the spaces and gently pry open the back cover. Set aside the back cover (The oddly shaped o-ring should be stuck to the cover, separate carefully and set it aside. Remove the 3 screws on the front of the AVCS, set the cover aside and discard the small o-ring. Push the center piece outwards until it starts to move out the back. Be careful, as there will be 6 small springs and 6 small retainers: DO NOT LOSE THEM!
![Image]()
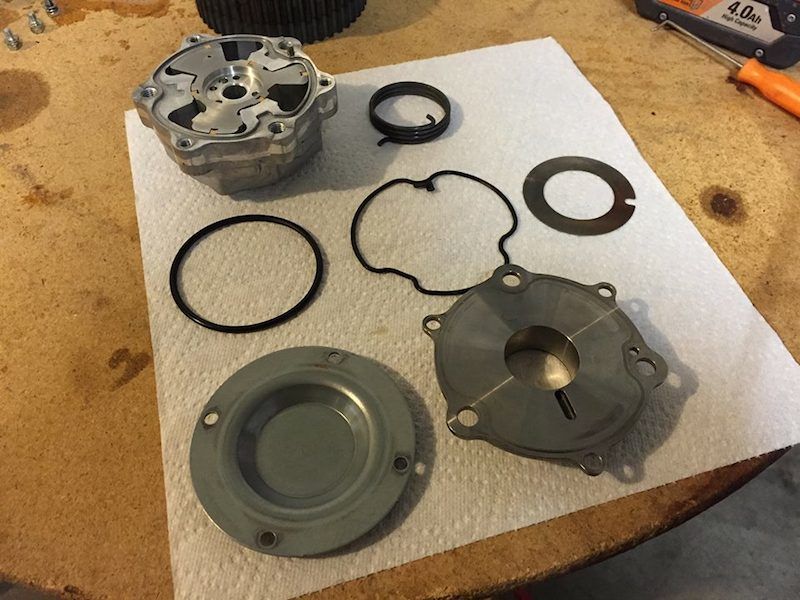
2.
Once you have everything separated, fill the small plastic cup with a small amount of cleaner solvent and put the springs and retainers in the cleaner. Swirl it around for 10 seconds and remove each piece with the small pliers. Set them aside to dry. WEAR GLOVES: Place each component in the paper plate and start cleaning. You can dump the solvent from the plastic cup on the piece. Clean each component thoroughly as there are oil passages.
Note: After cleaning each component, rinse them in the soapy water first then the clean water. Dry them out with compressed air if you have it and set aside. When you're done cleaning it will look like the picture below. (Sorry for shitty picture!)
![Image]()
3.
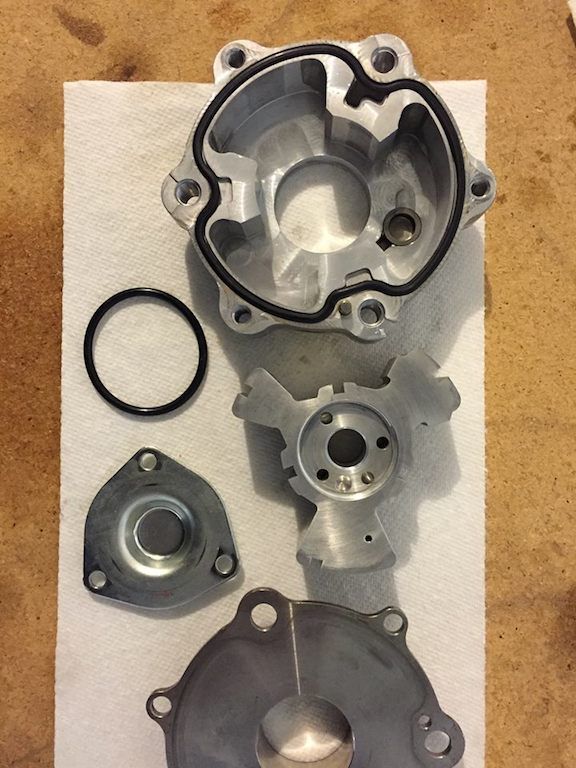
When you are done cleaning and once dried, take the piece with the three lobes and locate the lobe with the small piston-like part pictured below. Insert that piece in the circle first, and then slide it in the slot where the arrow is pointing. If you don't do this, you may place the piece in awkwardly and it may become stuck, possibly damaging the mating surfaces. You did it right when the lobed component sits flush with the housing.
![Image]()
4.
Place the spring in the retainer like in the picture below.
![Image]()
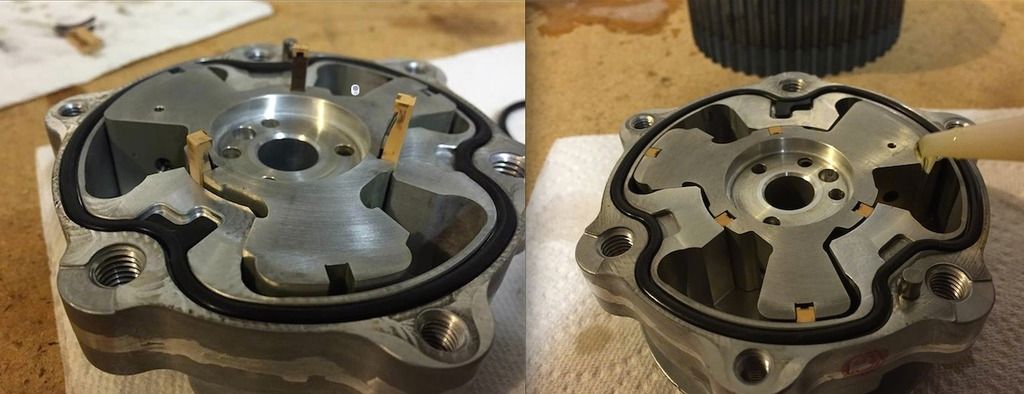
5.
There will be 6 slots to insert the springs. When all the springs are in, PRIME the AVCS with fresh engine oil. Fill the large spaces about half way. Clean the awkward looking oil seal with a paper towel or rag and place it back in it's designated position (It only goes in one way)
![Image]()
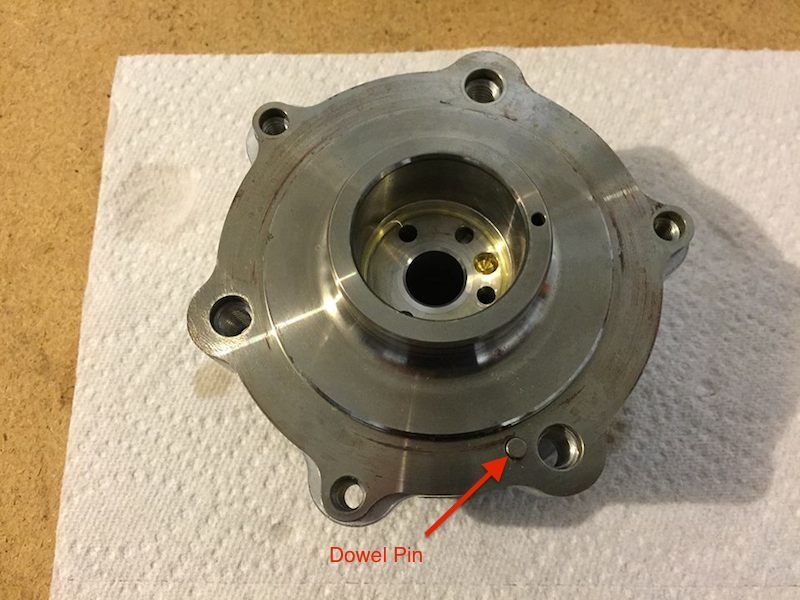
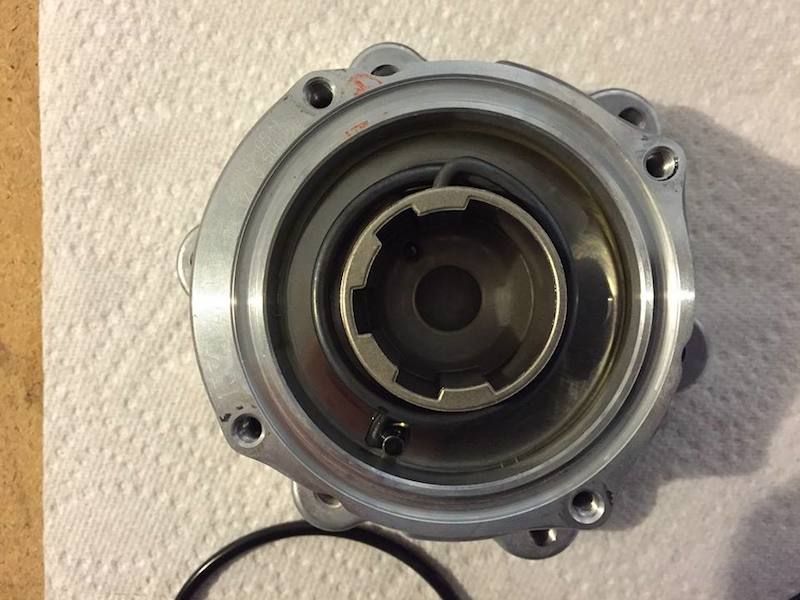
6.
The AVCS housing has a dowel pin, so you can't put the back cover on the wrong way. Just locate the small hole on the back cover next to the larger hole.
![Image]()
7.
Here is full description of what they do:
"DUAL AVCS (ACTIVE VALVE CONTROL SYSTEM) (FROM '08MY)
GENERAL
The dual AVCS (Active Valve Control System) changes the camshaft phase angle in relation to the camshaft sprocket to optimize valve timing of the intake and exhaust valves, improving torque in a low and medium speed range, output performance in a high speed range, emission performance, and fuel efficiency.
The ECM determines the best camshaft angle in relation to the crankshaft angle based on engine speed, vehicle speed, throttle angle, and other relevant parameters.
Under the control of the ECM, the oil flow control solenoid valve moves its spool to change the phase angle between the camshaft sprocket and camshaft successively by switching the oil path designed between the advance angle chamber and the retard angle chamber."
New AVCS gears from Subaru will be about $450+ for all four. That's a quite a bit of dough. So, you can choose to take your chances at bent valves and not clean the gears, buy brand new ones or simply clean them.
There are only a few components to each gear that can be taken apart and cleaned, so the process is rather easy. You just need to be mechanically inclined to do so, and of course, you need the right tools.
This is a "How-to" on cleaning these AVCS gears.
The tools you need:
1x Cordless Drill with an Impact function (If your drill doesn't have the impact function, you can buy an adapter at Lowes or Home Depot) (Drill not needed but will make the process much faster)
1x 3/8 Socket Adapter for the Drill
1x Company 23 Security Bit ($10 from Rallysportdirect)
1x Phillips Drill Bit (Or Screwdriver)
2x Picks
1x Angled Needle Nose Pliers
1x Small Pliers
1x Parts Cleaner (CRC brand is STRONG stuff, wear chemical resistant gloves and glasses for your own good!)
1x Container with Soapy Water
1x Container with Clean Water
1x Plastic Cup (NO FOAM CUPS!)
1x Paper or Plastic Plate (NO FOAM PLATES!)
1x Engine Oil (In a condiment bootle works best)
2x New OEM O-Rings #806939040
1x Torque Wrench (20-200in lbs)
1x Extra Pair of Hands (This will come in handy at the end)
You also would need compressed air and an air nozzle to dry out the components really fast, but letting them dry normally for a while is also an option.
Work on each AVCS individually from start to finish. There are two types of AVCS you will encounter. The Intake AVCS has 3 screws on the front and can be completely torn apart for cleaning, the Exhaust AVCS has a spring on the front, under the cover with the 4 screws. I will show how to clean the Exhaust AVCS when I edit this post.
WARNING: Subaru does NOT sell the components for the AVCS other than the O-rings. If you LOSE something, you will have to buy a new AVCS, so keep track of everything…
Note that you can easily identify the Driver side AVCS because the AVCS is mounted INSIDE the gears. The Passenger AVCS are mounted on the OUTSIDE of the gears. The Intake AVCS has a front cover with THREE screws and Exhaust AVCS has a cover with FOUR screws and a Spring inside it.
1.
Locate the torx bolts on the back of the AVCS gear and remove all. Separate the gear from the AVCS and set it aside. Locate the slit on the side of the AVCS where the red arrow is pointing in the picture and insert a pick between the spaces and gently pry open the back cover. Set aside the back cover (The oddly shaped o-ring should be stuck to the cover, separate carefully and set it aside. Remove the 3 screws on the front of the AVCS, set the cover aside and discard the small o-ring. Push the center piece outwards until it starts to move out the back. Be careful, as there will be 6 small springs and 6 small retainers: DO NOT LOSE THEM!
2.
Once you have everything separated, fill the small plastic cup with a small amount of cleaner solvent and put the springs and retainers in the cleaner. Swirl it around for 10 seconds and remove each piece with the small pliers. Set them aside to dry. WEAR GLOVES: Place each component in the paper plate and start cleaning. You can dump the solvent from the plastic cup on the piece. Clean each component thoroughly as there are oil passages.
Note: After cleaning each component, rinse them in the soapy water first then the clean water. Dry them out with compressed air if you have it and set aside. When you're done cleaning it will look like the picture below. (Sorry for shitty picture!)
3.
When you are done cleaning and once dried, take the piece with the three lobes and locate the lobe with the small piston-like part pictured below. Insert that piece in the circle first, and then slide it in the slot where the arrow is pointing. If you don't do this, you may place the piece in awkwardly and it may become stuck, possibly damaging the mating surfaces. You did it right when the lobed component sits flush with the housing.
4.
Place the spring in the retainer like in the picture below.
5.
There will be 6 slots to insert the springs. When all the springs are in, PRIME the AVCS with fresh engine oil. Fill the large spaces about half way. Clean the awkward looking oil seal with a paper towel or rag and place it back in it's designated position (It only goes in one way)
6.
The AVCS housing has a dowel pin, so you can't put the back cover on the wrong way. Just locate the small hole on the back cover next to the larger hole.
7.
Place the gear back in the way it came off. Again, it can only go in one way. Insert the torx bolts back in and tighten them down. Use that extra pair of hands to hold down the gears and torque the SMALL bolts to 45in lbs. Torque the LARGE bolts to 180in lbs. When you're finished with that, turn the AVCS over, insert the NEW OEM O-ring and put the front cover back on tightly and VOILA, you're DONE!
Just repeat each step for the other gear.
Now go have a celebratory beer!
REMEMBER to lube up the mating surface where the camshaft will go in!
Now to the Exhaust AVCS:
1.
The process is the same as the Intake. Start tearing down the front cover but DO NOT discard the big O-Ring, clean it and reuse it when you put everything back on. I couldn't find a way to separate the the lobed component from the housing, and since I didn't want to damage anything, I left it alone. When you take the front cover off you will notice there is a spring in the center, which is held on at two points. Use the Pick tool and pry out the spring at the top section.
Note: This spring was rather difficult to put back on. If you don't feel safe in taking out this spring, then DON'T. Skip all following steps and just simply clean everything as best as you can and put everything back on when you're done. Follow the same torque specs as the Intake AVCS. I only did it to be thorough with the cleaning. If you want to remove the spring, then read on!
![Image]()
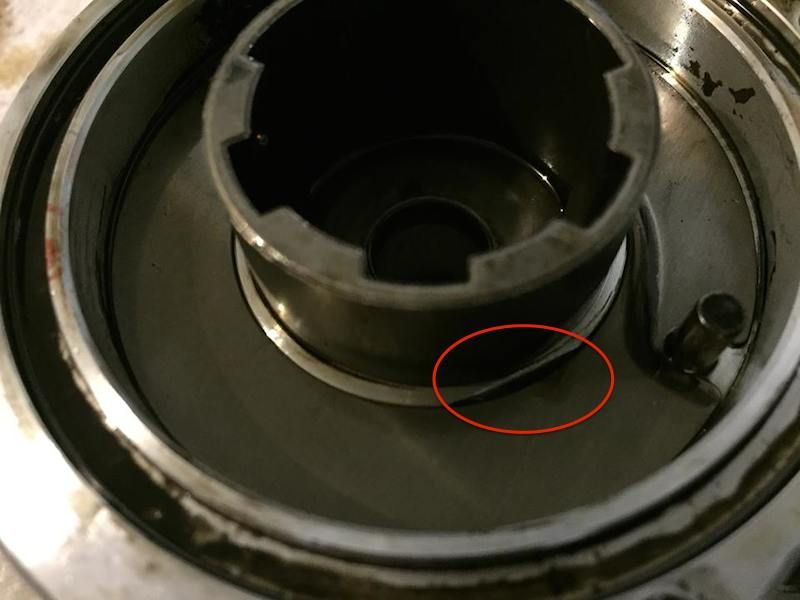
2.
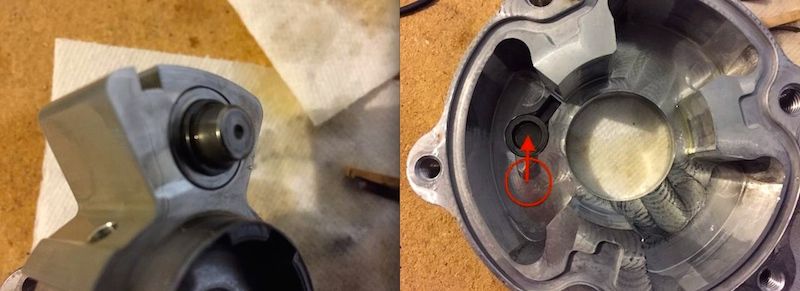
Once the spring is removed, you will see a thin metal shim sitting at the bottom. Don't try to shake it out. It won't come out on it's own, trust me... This is where the two picks come into play. Locate the small space in shown in the red circle and gently insert a pick in that space until you have a firm hold on it. If you can't find it, move the shim around until you do. With the pick firmly inserted, begin to lift up until you see the other side of the shim start to rise, and once that happens, place a pick under the shim and simply lift up and remove it. My apologies for not taking a picture of this process, it's kind of hard to do when you're by yourself
![Image]()
3.
When you have everything apart, spray everything with solvent, making sure everything is squeaky clean then dip each component in the soapy water, then in the clean water. Dry it with compressed air if you have it. Remember that you can't separate the lobed piece from the housing so don't try it or you may break something. Just clean it as it is. When you're done, it should look like the picture below.
![Image]()
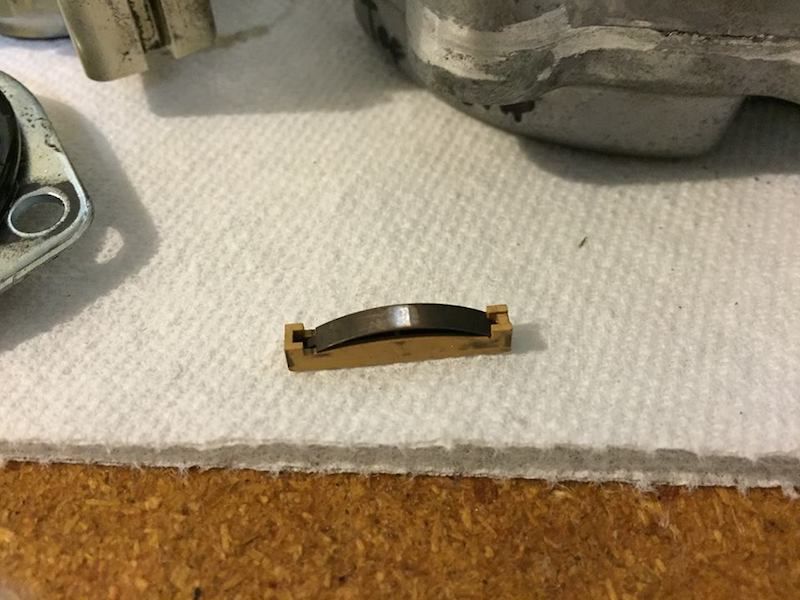
4.
Assemble the front first, where the spring was. Put a little oil in the space where the shim will go back in and then place the shim back on top of the oiled surface. To put the spring back in, the easiest way to do it was to hook the top part of the spring on first, then take the Angled Needle Nose Pliers and hold the bottom part of the spring, then use the strength of a Norse god to wind the spring back to it's original location. This may take a few tries. When you're done it will look just like the picture below.
![Image]()
5.
Put the O-ring back on, then the front cover and tighten all four screws firmly. Flip it over and put the awkward looking O-ring back on in it's designated position. Remember to PRIME with oil just like before. Locate the dowel pin on the housing, then take the back cover and put it back on. Take the gear and put it back on top, then take the torx bolts and tighten them down. Toque the SMALL bolts to 45in lbs. Torque the LARGE bolts to 180in lbs. BOOM. You're done!
![Image]()
Once you're done, do the same for the other gear.
Make sure you have a celebratory beer after each completed AVCS cleaning. (If you're too young to drink alcohol, go have a soda)
Again, make sure to lube up the mating surface where the camshaft will go in!
Just repeat each step for the other gear.
Now go have a celebratory beer!
REMEMBER to lube up the mating surface where the camshaft will go in!
Now to the Exhaust AVCS:
1.
The process is the same as the Intake. Start tearing down the front cover but DO NOT discard the big O-Ring, clean it and reuse it when you put everything back on. I couldn't find a way to separate the the lobed component from the housing, and since I didn't want to damage anything, I left it alone. When you take the front cover off you will notice there is a spring in the center, which is held on at two points. Use the Pick tool and pry out the spring at the top section.
Note: This spring was rather difficult to put back on. If you don't feel safe in taking out this spring, then DON'T. Skip all following steps and just simply clean everything as best as you can and put everything back on when you're done. Follow the same torque specs as the Intake AVCS. I only did it to be thorough with the cleaning. If you want to remove the spring, then read on!
2.
Once the spring is removed, you will see a thin metal shim sitting at the bottom. Don't try to shake it out. It won't come out on it's own, trust me... This is where the two picks come into play. Locate the small space in shown in the red circle and gently insert a pick in that space until you have a firm hold on it. If you can't find it, move the shim around until you do. With the pick firmly inserted, begin to lift up until you see the other side of the shim start to rise, and once that happens, place a pick under the shim and simply lift up and remove it. My apologies for not taking a picture of this process, it's kind of hard to do when you're by yourself
3.
When you have everything apart, spray everything with solvent, making sure everything is squeaky clean then dip each component in the soapy water, then in the clean water. Dry it with compressed air if you have it. Remember that you can't separate the lobed piece from the housing so don't try it or you may break something. Just clean it as it is. When you're done, it should look like the picture below.
4.
Assemble the front first, where the spring was. Put a little oil in the space where the shim will go back in and then place the shim back on top of the oiled surface. To put the spring back in, the easiest way to do it was to hook the top part of the spring on first, then take the Angled Needle Nose Pliers and hold the bottom part of the spring, then use the strength of a Norse god to wind the spring back to it's original location. This may take a few tries. When you're done it will look just like the picture below.
5.
Put the O-ring back on, then the front cover and tighten all four screws firmly. Flip it over and put the awkward looking O-ring back on in it's designated position. Remember to PRIME with oil just like before. Locate the dowel pin on the housing, then take the back cover and put it back on. Take the gear and put it back on top, then take the torx bolts and tighten them down. Toque the SMALL bolts to 45in lbs. Torque the LARGE bolts to 180in lbs. BOOM. You're done!
Once you're done, do the same for the other gear.
Make sure you have a celebratory beer after each completed AVCS cleaning. (If you're too young to drink alcohol, go have a soda)
Again, make sure to lube up the mating surface where the camshaft will go in!


